The official Shimano Ultegra electronic TT shifter is supposed to hit stores in September
Triathlon Forum
Login required to started new threads
Login required to post replies
Re: DIY Ultegra Di2 TT [lightninrod21]
[ In reply to ]
Re: DIY Ultegra Di2 TT [Herbert]
[ In reply to ]
Herbert wrote:
The official Shimano Ultegra electronic TT shifter is supposed to hit stores in SeptemberJust in time for another season to have passed.
Re: DIY Ultegra Di2 TT [Cesc]
[ In reply to ]
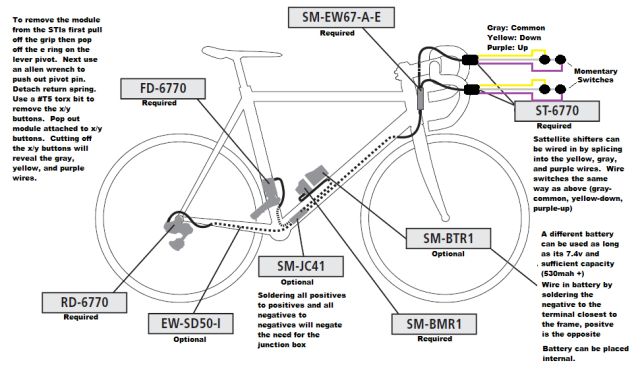
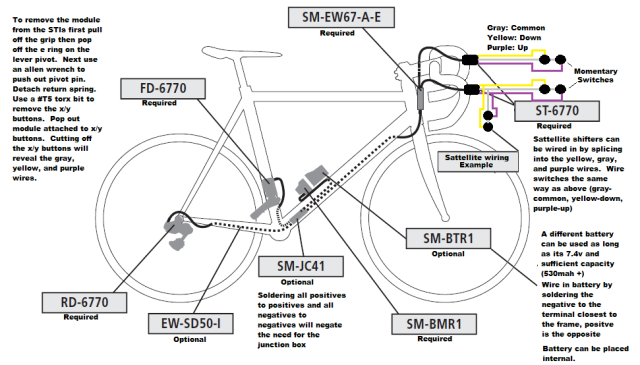
Heres a diagram and some notes:
Also, a link to the cateye buttons which are very popular for this application:
http://www.performancebike.com/...chTerm=cateye+remote
Also, a link to the cateye buttons which are very popular for this application:
http://www.performancebike.com/...chTerm=cateye+remote
Re: DIY Ultegra Di2 TT [locutus]
[ In reply to ]
Fascinating stuff - thanks for all the detail.
Since you are answering questions, and I have not seen this clearly in the thread, how did you manage the brake levers? It is not clear if
you deployed satellite shifters or not on the brakes. If so, could you post pics and provide a bit more detail? From the talk about simple
surface mount, it seems one could splice a shifter switch onto any pursuit/brake combo , such as my Vision setup.
I'm beginning to get enthused on this...
.
" I take my gear out of my car and put my bike together. Tourists and locals are watching from sidewalk cafes. Non-racers. The emptiness of of their lives shocks me. "
(opening lines from Tim Krabbe's The Rider , 1978
Re: DIY Ultegra Di2 TT [TriDevilDog]
[ In reply to ]
TriDevilDog wrote:
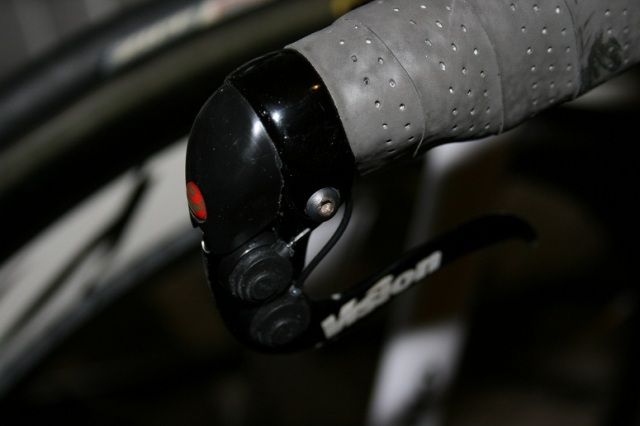
it seems one could splice a shifter switch onto any pursuit/brake combo , such as my Vision setup. .
Yes, I have the vision levers also and mounted the switches on top and on the side ( so that the thumb can trigger down, finger trigger up). The good thing about these switches is that they are surface mount and small...and can be put any where youre willing to run them. I will take pictures and post soon.
Re: DIY Ultegra Di2 TT [locutus]
[ In reply to ]
Thanks a lot for this. So I connect the cateyes with the blackbox of the sti for the extensions and then I Need the handlebar harness for shifting at the breaks?
Two pairs of these cateyes are a Lot more cheaper than the DA shifter and levers
Two pairs of these cateyes are a Lot more cheaper than the DA shifter and levers
Re: DIY Ultegra Di2 TT [locutus]
[ In reply to ]
No sorry, 4 pairs of the cat eyes buttons!?
Re: DIY Ultegra Di2 TT [locutus]
[ In reply to ]
After looking at some shimano tech docs (http://techdocs.shimano.com/...6577569830773904.pdf) it seems that the thing to get is main lever assemblies:
Y6VE98010 right side
Y6VD98010 left side
I wonder when Shimano will start selling replacement parts. Of course, our discussion of this may force them to not sell any replacement parts.
Scott
Y6VE98010 right side
Y6VD98010 left side
I wonder when Shimano will start selling replacement parts. Of course, our discussion of this may force them to not sell any replacement parts.
Scott
Re: DIY Ultegra Di2 TT [Cesc]
[ In reply to ]
Cesc wrote:
No sorry, 4 pairs of the cat eyes buttons!?Hello, You will need a minimum of two pairs (or two double throw switches if you choose). If you want shifting on the base bars, youll need two additional pairs.
Re: DIY Ultegra Di2 TT [lemond853]
[ In reply to ]
On that tech document I dont see the electronic assembly labeled. The part number you listed seems to be the mechanical parts to the lever assembly. Youre right though: it would be a whole lot easier if shimano sold just the internals.
Re: DIY Ultegra Di2 TT [locutus]
[ In reply to ]
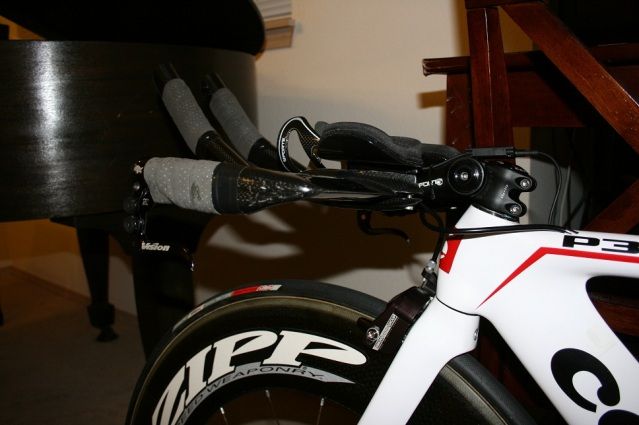
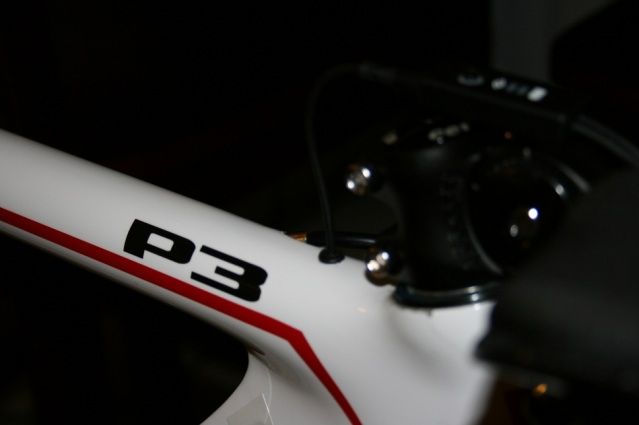
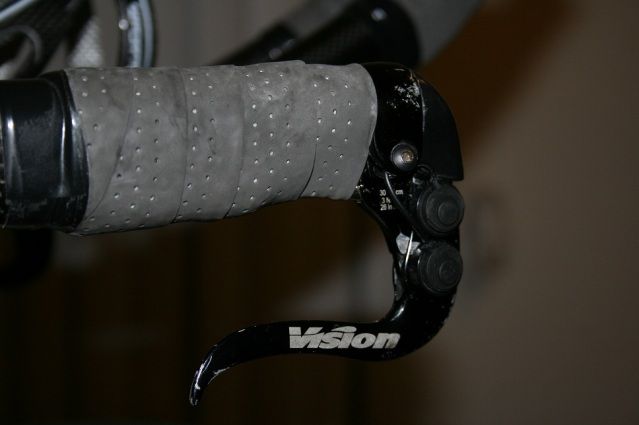
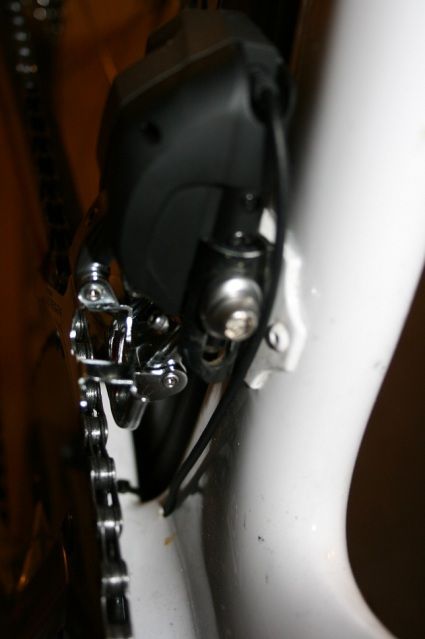
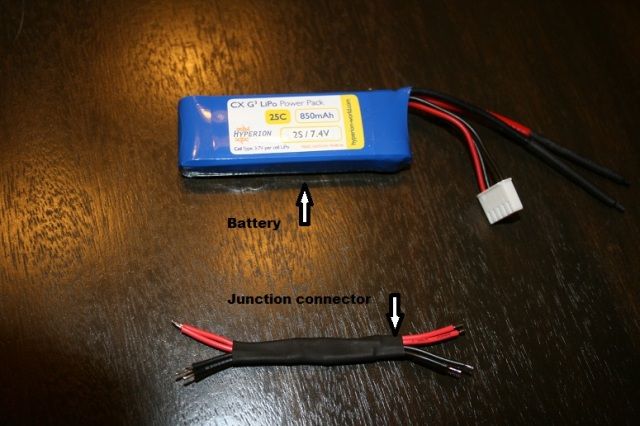
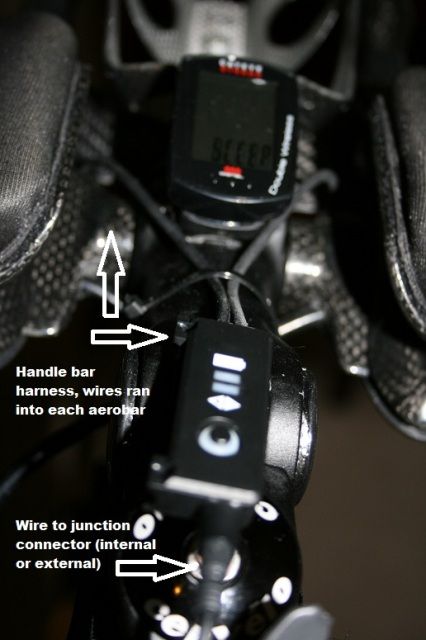
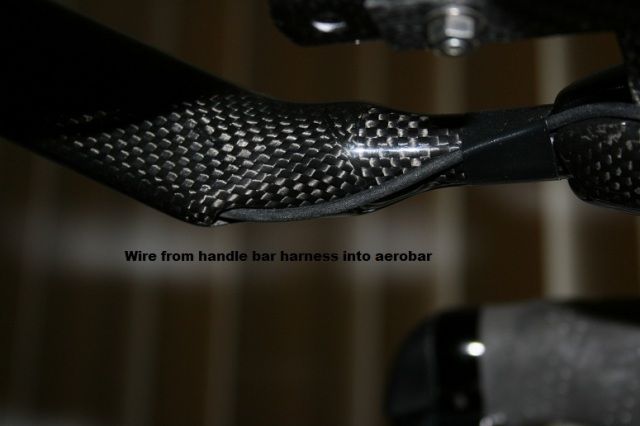
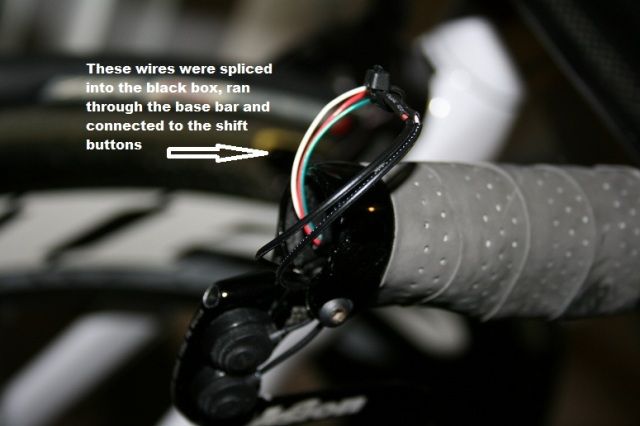
Heres some more pictures for those who asked. The first couple pictures show the routing for the handlebar harness, third picture show shift buttons on the vision levers (sorry for all the scratches!), fourth show the wiring for the internal battery to the external battery mount under the seat, and the last shows that the ultegra di2 wiring will fit in existing holes with no mods. Im happy to answer anymore questions or take more pictures if you need.

Re: DIY Ultegra Di2 TT [locutus]
[ In reply to ]
Thanks for the idea and info Dave.
The Di2 upgrade kit came on Friday (Euro 999). I resisted doing anything 'til 8pm Saturday and spent two-half hours putting the kit on my Planet X Stealth. I had to use external wiring and took my time but got it working with the STIs (dangling from the aero bars). The battery did mean I lost one of the bottle mounts (or have to use a tiny bottle). I can see the battery getting put in the seat post before too long.
Today I probably spent three hours then making it work with my bars. I couldn't get the cateye remotes in the UK (and the US shop still hasn't delivered) and so I went with a combination of: two momentary push buttons on each of the aero bars and an "(on) off (on)" toggle switch on each of the bull horns. I used some blue tack and tape to keep the toggle switches to front of the brake levers (after removing the rubber caps). To block up the holes in the aero bars I cut up a DVD case and drilled small holes in it for the push buttons.
I didn't bother undoing the torx screws in STI levers, just cut the wire and pulled the "black" box out. I then used three small junction boxes to connect the "up", "down" and ground wires. The "black" box and the junction boxes fit inside the aero tubes.
It rides well. The toggle switches (which go left/right) are intuitive when on the bull horns. The push buttons on the aero bars are less intuitive but I am sure that will come with time. The best bit so far was coming down a hill and turning left just after a parked car. I was on the bull horns and just changed from big to little chain ring, changed the cassette without worrying about getting my hands back to the ends of the aero bars. And the shifting has been good, even changing chainrings while pedalling hard up a hill.
As I have done everything in a bit of a rush, with cheap and ugly switches, I am going to take a bit of time riding it and then decide what switches I want, etc. Then I'll put on the new switches, new bar tape on and get rid of the junction boxes. Oh, and it needs to be more waterproof. I am sure it could handle a bit of rain at the moment but I wouldn't be confident about a long ride on a rainy day.
My spring project will then be to turn it into a "sequential" gear box (i.e. deciding when to move chain rings and cassette at the same time). The programming should be relatively straightforward - I've had a play with it in VBA - and the input/output hardware should be pretty easy and small. The issue then is getting a small microcomputer that will fit into one of the shifters with a battery. The Arduino Nano might just fit the bill (and there actually even smaller ones). Even if I can get it to work though, it would need to be reliable and robust enough to use in the rain. That's going to be the difficult bit.
Here's some photos. Remember, I am still at the "its ugly but works" stage.
Re: DIY Ultegra Di2 TT [locutus]
[ In reply to ]
Firstly may I say what you have done is great and well done on the nerve to try this with relitivly expenceive kit and kudos to you to go on and to produce this thread.
But please, please, please can you and other people who may copy this idea read and take on board what I am about to say.
I flew RC Helicopters before Triathlon and saw the rise of Lipo batterys to the Hobby market.
These batterys have separate cells to make up one "Pack"
LiPo batteries should only be charged on a charger that is specifically compatible with LiPo batteries and some have a built-in cell balancer.
Unbalanced cells within a pack will reach full charge at different times, increasing the chances of one cell being overcharged and causing a fire.
Lithium polymer cells (Lipo) can swell and expand when shorted, charged incorrectly, overcharged, overdischarged, heated, punctured, dropped, kicked, or otherwise mistreated. And the results can be catastrophic as this can also cause fires
LiPo batteries should only be used in conjunction with a low-voltage cutoff or alarm to prevent the pack from being discharged too far (Fire again)
Also never store a LiPo battery at full charge LiPo batteries should be stored with a percentage of its total capacity, usually around 50%. Refer to your battery�s instructions on storing the battery safely
Treated properly Lipo batterys are safe and powerfull
When I was flying RC Helis I have seen Lipo fires 1st hand and they are scary, no warning and the things are in flames and belive me they burn.....really burn !!
But hey at the end of the day it may never happen to you and it is your bike after all treat them right and it won't IMO and it's likly not just mine, I wouldn't "hide" one in my pride and joys frame and charge it with any old charger and if for some reason I did (and I wouldn't) the bike would not come in the house it would stay at the bottom of the garden !
If you think however I am taking $hit google lipo battery dangers
(No disrespect to you great job + thread, just making you aware of some potential dangers)
Re: DIY Ultegra Di2 TT [Dead Keen]
[ In reply to ]
Looking good! Its nice shifting from the bullhorns right? Luckily switches are easy and cheap to swap so if you decide you dont like your current set up, its easy enough to experiment with different buttons. Im not sure what the cost of international shipping is but if youd like, I can pick up some of the cateyes and forward them to you. They worked out great mounting to my levers. Be sure to keep us all updated on your sequential shifting project!
Re: DIY Ultegra Di2 TT [locutus]
[ In reply to ]
Hey,
but how do I connect 4 pairs of momentary switches? Can I use two EW-SD50 cables and connect them to the blackbox and the momentary switches? Your diagram shows only the option with two pairs of switches.
Thanks for helping me.
but how do I connect 4 pairs of momentary switches? Can I use two EW-SD50 cables and connect them to the blackbox and the momentary switches? Your diagram shows only the option with two pairs of switches.
Thanks for helping me.
Re: DIY Ultegra Di2 TT [Cesc]
[ In reply to ]
You just splice into the three wires from the black box. I modified the diagram to show an example of how it can be done. Let me know if you need help with anything else or want further clarification.
Re: DIY Ultegra Di2 TT [locutus]
[ In reply to ]
how long is the cable from the blackbox to the STI levers? So, I splice the cables (yellow, grey and purple) and extend them with a normal cable to the break levers?
Re: DIY Ultegra Di2 TT [Cesc]
[ In reply to ]
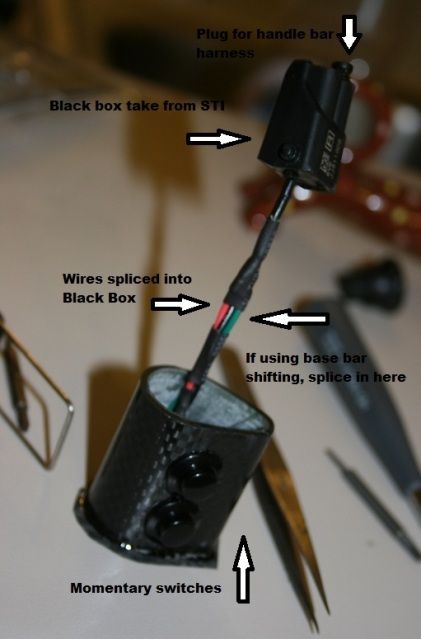
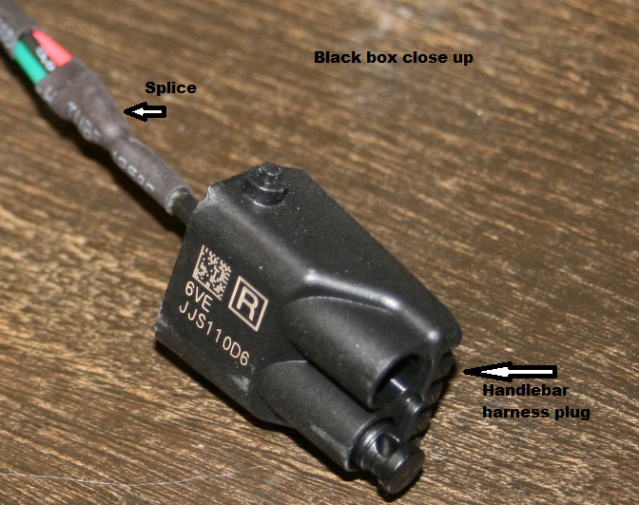
Hello the wires from the black box to the the sti shift buttons are only about 2 inches long so once you remove the black box, you'll need to lengthen the wires. Yes, you just splice in and extend to the brake levers. If you'd like actual pictures of how I did mine, I can take some when I get home. It sounds complicated but is fairly simple once you start things.
Re: DIY Ultegra Di2 TT [locutus]
[ In reply to ]
Hi,
pictures would be great. Sorry for my questions, but I don`t want to make mistakes.
pictures would be great. Sorry for my questions, but I don`t want to make mistakes.
Re: DIY Ultegra Di2 TT [Cesc]
[ In reply to ]
I cut the wire between the "black box" and the switch in the STIs without undoing or unscrewing anything.
Then I joined the wires to my new switches using blocks like this:

I cut the connector blocks into six separate one to make it easier to fit inside the aero bars. Each side (left: chainring, right: cassette) has three blocks (up, down, ground) and I put the end of each of the three "black box" wires into the end of one of the connectors (and screwed it in). Then I screwed in the wires from the two switches (aero bar and bull horn) to the other side of the connector block. So if you look at the connector block, one side has one wire going in (from the "black box") and the other side will have two, three or four wires coming out (two "ups", two "downs" and 2, 3 or 4 grounds, depending on the type of switches you use).
Using connector blocks adds weight, makes things a little harder to waterproof and stuff but makes it very easy to change switches, swap the "up" one for the "down" one, etc. Once I am happy with my switches and set up I will just join the wires direct and get rid of the connector blocks.
Out of interest, I think I like the toggle switches compared with the momentary switches. A few times I have tried to "toggle" the momentary switches on the aero bars and so that is something I might change.
Then I joined the wires to my new switches using blocks like this:
I cut the connector blocks into six separate one to make it easier to fit inside the aero bars. Each side (left: chainring, right: cassette) has three blocks (up, down, ground) and I put the end of each of the three "black box" wires into the end of one of the connectors (and screwed it in). Then I screwed in the wires from the two switches (aero bar and bull horn) to the other side of the connector block. So if you look at the connector block, one side has one wire going in (from the "black box") and the other side will have two, three or four wires coming out (two "ups", two "downs" and 2, 3 or 4 grounds, depending on the type of switches you use).
Using connector blocks adds weight, makes things a little harder to waterproof and stuff but makes it very easy to change switches, swap the "up" one for the "down" one, etc. Once I am happy with my switches and set up I will just join the wires direct and get rid of the connector blocks.
Out of interest, I think I like the toggle switches compared with the momentary switches. A few times I have tried to "toggle" the momentary switches on the aero bars and so that is something I might change.
Re: DIY Ultegra Di2 TT [Cesc]
[ In reply to ]
Re: DIY Ultegra Di2 TT [locutus]
[ In reply to ]
This is very cool. My buddy and I have been talking about trying something similar for months and you have inspired me to try it. I have a few more questions. First, Is the battery mount necessary if you plan to run a different battery? Scond, should I get a down tube harness just to use the connectors if I pan to make my own harness and junction connections? And finally, do the di2 derailleurs just have connectors on them or is there a short harness coming off them to solder to? Thanks for all the great information and pictures.
Re: DIY Ultegra Di2 TT [Jkingham]
[ In reply to ]
Re: DIY Ultegra Di2 TT [robjustice]
[ In reply to ]
It's my understanding that there is a CAN controller chip in the battery mount that is required to interface with the system; it doesn't just send constant uninterrupted current. So the Di2 battery mount is required; the battery itself can be third-party.
Carlton Bale wrote:
It's my understanding that there is a CAN controller chip in the battery mount that is required to interface with the system; it doesn't just send constant uninterrupted current. So the Di2 battery mount is required; the battery itself can be third-party.Thanks Carlton. That is the last bit I needed to get mine set up.