As one who always loves a change of pace, I stripped all of the plasti dip off of my last ride and sold it away for funds for a new ride this season. And also as someone who always loves a change of pace, I purchased a Scott Plasma 3 and changed up its grey paint job with a little something more stealthy. Yeah, I tried to go battleship gray and then green with it first, but in the end I wasn't feeling either color so I went back to matte black. I love it!
As another splurge, I used some of this year's bonus money to buy a nice SRAM Etap aero kit on the ride. Of course, I couldn't let those silver parts show, so it them up with some plasti dip as well. I am now probably the first person in the world to have black edition SRAM Red Etap. I also replaced one pair of regular blips with the Etap clics which make a nice clean setup by sitting right in the tips of the aerobars.

 I also ordered up a nice Dash saddle since the Fizik Tritone was just not feeling comfortable to me. I threw some tri rig parts on there to boot, including the Tririg Omega X aero brake on the front and the Tririg Beta under the saddle bottle holder for a nice aero setup.

I got some nice 3T Brezza aero bars, but the extensions weren't quite what I wanted, so I bought some Profile Design T5 carbon extensions and painted them with black matte plasti dip so they would match the rest of the bike.
Add in some Zipp 808's with some custom fluro green decals to match the other fluro green highlights on the bike.
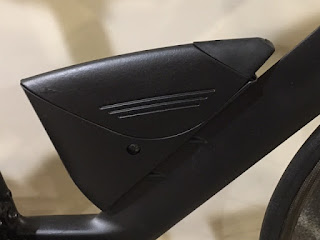
 Then there's the Bontrager Speed Concept II bento box and the custom aero cover that I made to hide the blip box and wires on the stem. Also, I picked up a used VR Torhans aero waterbottle. I cut it to make it into a flat kit and then painted it with matte black plasti dip to match everything else.
All in all I think it came out pretty nicely. It should ride super fast. I can't wait to jump on!

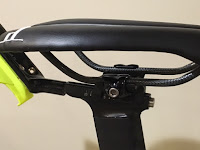


As another splurge, I used some of this year's bonus money to buy a nice SRAM Etap aero kit on the ride. Of course, I couldn't let those silver parts show, so it them up with some plasti dip as well. I am now probably the first person in the world to have black edition SRAM Red Etap. I also replaced one pair of regular blips with the Etap clics which make a nice clean setup by sitting right in the tips of the aerobars.

 I also ordered up a nice Dash saddle since the Fizik Tritone was just not feeling comfortable to me. I threw some tri rig parts on there to boot, including the Tririg Omega X aero brake on the front and the Tririg Beta under the saddle bottle holder for a nice aero setup.
I got some nice 3T Brezza aero bars, but the extensions weren't quite what I wanted, so I bought some Profile Design T5 carbon extensions and painted them with black matte plasti dip so they would match the rest of the bike.
Add in some Zipp 808's with some custom fluro green decals to match the other fluro green highlights on the bike.
 Then there's the Bontrager Speed Concept II bento box and the custom aero cover that I made to hide the blip box and wires on the stem. Also, I picked up a used VR Torhans aero waterbottle. I cut it to make it into a flat kit and then painted it with matte black plasti dip to match everything else.
 All in all I think it came out pretty nicely. It should ride super fast. I can't wait to jump on!


Attached Files:
-
 IMG_0965.JPG (121 KB)
-
IMG_0966.JPG (89.9 KB)
-
IMG_0975.JPG (84.1 KB)
-
IMG_0969.JPG (69.3 KB)
-
IMG_0967.JPG (119 KB)