I watched the video-that does seem to move more than I would have expected it to. Do you have a local TREK shop to take it to?
Apparently this is normal according to other SC owners. And this is particularly what gives the bike its very pleasant behavior uphill and downhill in addition to having very good performance!
I got my order confirmation email today (I’m mellowing in my old age, I found they hit the perfect tone of cheesy marketing without overdoing it), but it doesn’t have an estimated delivery date on there. For those that have gone the P1 route before, do you get further emails throughout the build stages, or is it just the order received and order shipped?
In other news, I have moved into the 21st century and lastnight managed to get my new Roval CLX wheels fitted to the road bike and had my first road tubeless ride. Must admit, if I’d been blind testing then I would not have been able to tell any difference between my tubed tyres and the tubeless. And I certainly notice the latex tubes when I put them in, so on one hand then the world didn’t come to an end, as perhaps I was worried would happen with road tubeless, but equally not sure the claims from some of the advocates on comfort are fully there. The miracle was that I managed to get the tyres to mount with my standard high pressure track pump though - were a complete mare to get on the rims, but as a consequence did ‘pop’ way easier than my MTB ones.
Nope that’s the sucky thing. Ordering p1, You need to specify the tower height. You do get two 5mm spacers as well as the angled ones. But If you stuff up the tower height you need to order different ones again. They are like $30us each or something…. But! You don’t get the bolts with them. Typical trek…… you think you can order a few bolts right ? Nope. They come in a case and you get all the different bolt lengths as one order. Atleat that’s what the website says. And those case of bolts (of which you only need 4 for your towers) are around $300 aud, unsure of the us price. It’s ridiculous. The towers you buy if you get that wrong should come with correct length bolts. You may get lucky with your trek Shop and they may have some lying around. But yeh, you want to get the tower height right first go.
Are you talking about different size spacers? I mine came with a 10 and a 5 and an angled I believe. I did order an 30 and 45mm spacers as well. Depending on the length of the race, my aggression on the front changes. But the bolts that already come with the bike are the same bolts that you use for the different size spacers. No new bolts needed.
If you are added spacers(5mm or the wedge) under the tower topper is when the bolt length changes. The bolts that go through the bottom of the basebar don’t change.
Nope that’s the sucky thing. Ordering p1, You need to specify the tower height. You do get two 5mm spacers as well as the angled ones. But If you stuff up the tower height you need to order different ones again. They are like $30us each or something…. But! You don’t get the bolts with them. Typical trek…… you think you can order a few bolts right ? Nope. They come in a case and you get all the different bolt lengths as one order. Atleat that’s what the website says. And those case of bolts (of which you only need 4 for your towers) are around $300 aud, unsure of the us price. It’s ridiculous. The towers you buy if you get that wrong should come with correct length bolts. You may get lucky with your trek Shop and they may have some lying around. But yeh, you want to get the tower height right first go.
Are you sure about this? I will have to look at my extra bolts when I get home. The bolts that mount the tower bases from the bottom of the basebar are all the same size iirc regardless of tower base height. My p1 order came with several different size bolts to mount the spacers/tower toppers. Unlike previous models, the bolts do not go through the entire tower base. There are threads at the bottom of the tower base and top of the tower base for fastening. I have two 7 deg wedges mounted and needed one of the longer bolts to ensure enough thread engagement.
Edit: just looked at the service manual. The underside bolt is M6x20mm and there are 3 different lengths for the top side (25mm, 35mm, 45mm). All of those bolts should have came with a P1.
If you are added spacers(5mm or the wedge) under the tower topper is when the bolt length changes. The bolts that go through the bottom of the basebar don’t change.
But those bolts come with the bike. Is that not the same for you guys? I have the angled spacer on there and the bolts were in the bag.
Nope that’s the sucky thing. Ordering p1, You need to specify the tower height. You do get two 5mm spacers as well as the angled ones. But If you stuff up the tower height you need to order different ones again. They are like $30us each or something…. But! You don’t get the bolts with them. Typical trek…… you think you can order a few bolts right ? Nope. They come in a case and you get all the different bolt lengths as one order. Atleat that’s what the website says. And those case of bolts (of which you only need 4 for your towers) are around $300 aud, unsure of the us price. It’s ridiculous. The towers you buy if you get that wrong should come with correct length bolts. You may get lucky with your trek Shop and they may have some lying around. But yeh, you want to get the tower height right first go.
Are you sure about this? I will have to look at my extra bolts when I get home. The bolts that mount the tower bases from the bottom of the basebar are all the same size iirc regardless of tower base height. My p1 order came with several different size bolts to mount the spacers/tower toppers. Unlike previous models, the bolts do not go through the entire tower base. There are threads at the bottom of the tower base and top of the tower base for fastening. I have two 7 deg wedges mounted and needed one of the longer bolts to ensure enough thread engagement.
Edit: just looked at the service manual. The underside bolt is M6x20mm and there are 3 different lengths for the top side (25mm, 35mm, 45mm). All of those bolts should have came with a P1.
Ahhh my bad. I thought the towers required different size bolts. Well that is handy then!
2x7 degree wedges is that actually giving you a higher tilt than the 14 degrees ? I have a 30mm tower and one angled spacer and hitting 14 degrees ?
Yeah I’m running two deg 7 wedges to get 21 deg of tilt. Tilt to the extension tip is even more. I don’t have a lot of riding on it (I’ve been injured) but the few rides I’ve done, it feels more comfortable. I may have to go to a smaller tower base with the increase stack of two 7 degree wedges.
Yeah I’m running two deg 7 wedges to get 21 deg of tilt. Tilt to the extension tip is even more. I don’t have a lot of riding on it (I’ve been injured) but the few rides I’ve done, it feels more comfortable. I may have to go to a smaller tower base with the increase stack of two 7 degree wedges.
How were you able to screw in 2 x 7 deg spacers??
The holes line up. It’s close to not lining up but I had no issues getting them to line up.
Hello
If someone is building a Speed Concept SLR from a frameset (seems to be the cheapest way to go about it), I’ve just posted a cockpit kit for sale in the classified.
Everything new (never installed) from my 2023 SLR. Details in the classifieds.
Since this is a thread dedicated to the bike, I thought it might be helpful to someone in the build process to have all these parts sourced at once and at discount…

What system did you go with?
Post pics of your bike…not enough pics on this thread
I went with the AeroCoach titanium Ascalon extensions; I just loved how clean their SLR-specific adapter is. Looks OEM.
Here’s a bunch of pics of my 2023 SC SLR just built mid September.
It’s a SLR 7 Ultegra build Project one with Full Fade paint scheme: Rage Red > Deep Dark Blue with the logo in “brushed chrome”.
The colors are hard to render in picture - looks better in person.
Here’s a couple of pics the bike shop posted after the build (but before setting my fit on it and before my tinkering).
The Pro 51mm wheels will be for training.


This has been an expensive project so far as this is my first Disc Brake bike and therefore none of my existing race wheels are compatible, had to figure out a power meter solution too as I was using Powertap Wheels. I stopped counting. Especially knowing this bike likely won’t be much faster (if at all) than the Gen2 SC it replaces haha! But nice to sport a new ride.
Also planning to go Tubeless after swearing for years I would stick with Latex.
Ended up getting a Stages LR powermeter on a Dura-Ace crank I sent in for ‘factory install’.
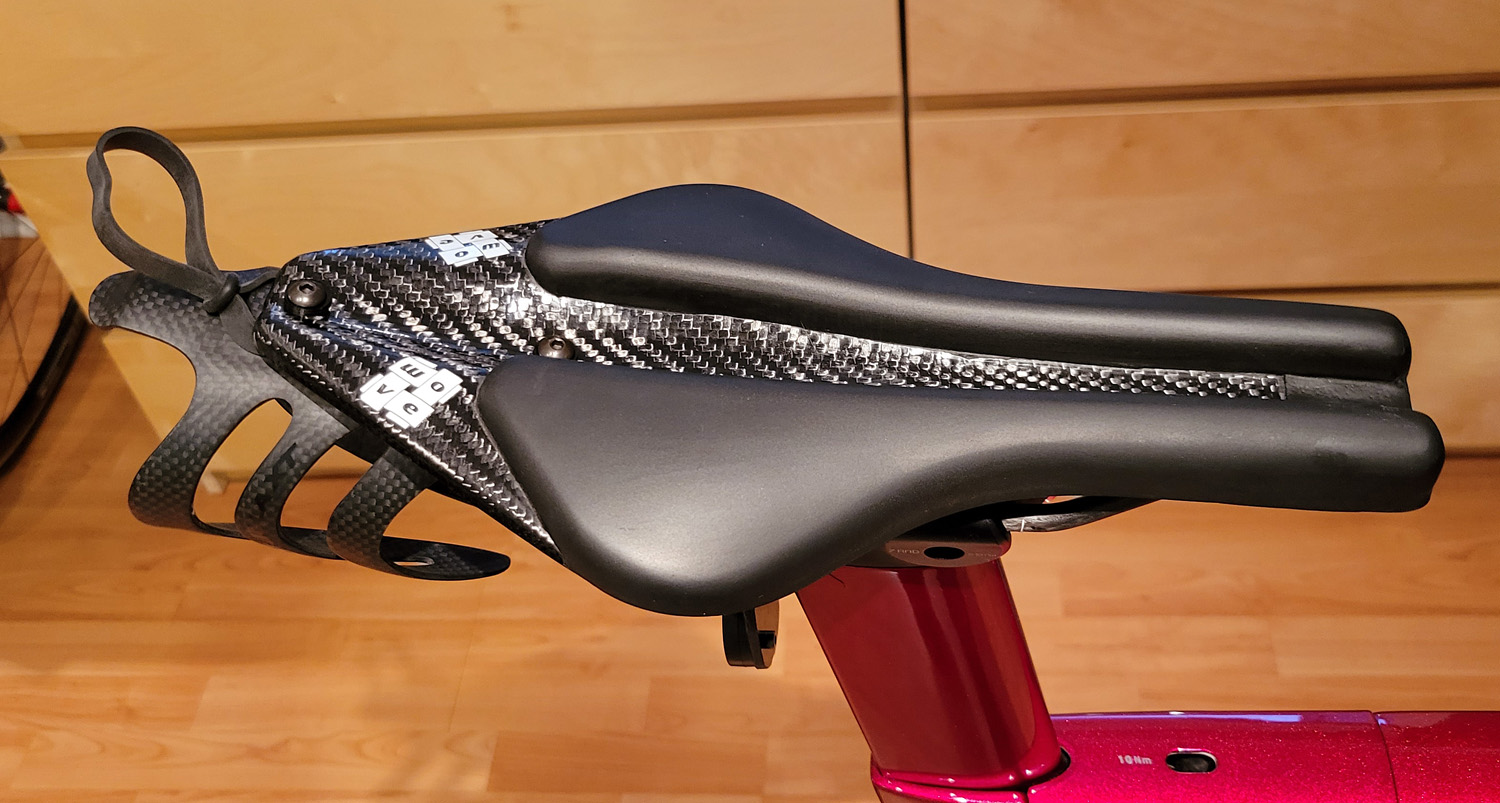
First upgrade was the saddle - went with the Wove v8 Saddle and so far love it (I plan to post a review on their thread when I have a chance). It’s mind-blowing light ![]()
Also love the built-in bottle mount. I played with it and 2 bottles is possible.
I was not happy with the Aerocoach accessories for the Garmin and bottle mounts.
With my old eyes, I need big numbers and I use a Garmin 1040 computer, too big and heavy for the 3D printed mount they provided held by a single bolt.
The extensions are quite close from each other (or quite far if inversing the adapters) and the larger Garmin did not fit well between my wrist. Plus it was vibrating due to the heavier weight.
Also wanted both the Garmin and the BTA bottle in specific spots to make the best use of the available space.
I also did not like their carbon fiber sheet being mounted between the SC adapters and the bars. Looked funny. So I made my own (larger) carbon fiber sheet that mounts between the bars and the arm cups and is used to mount and locate both the BTA bottle and the Garmin computer (see later pics).
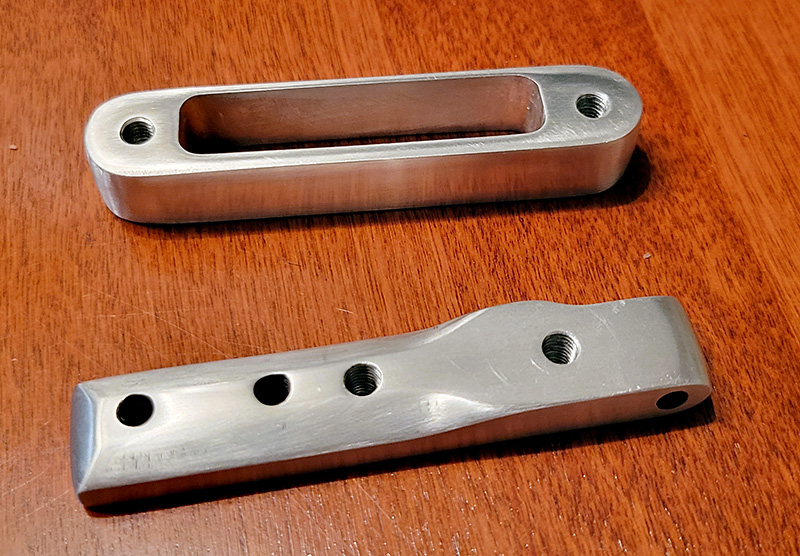
I also designed some bits to me made in Aluminum and tried to find a local shop to machine them, but this ended up way to expensive for the quotes I got especially not knowing if I would be happy with that setup…
So I just got aluminum bar stock online for a few bucks and hacked my own using an angle grinder, a drill press and some taps;
Result below… I found a local shop that anodized them in black after the picture for $30 each.
- The threaded bottle space is not used in the following pictures but I can insert it below the 50mm BTA spacer to raise the BTA bottle further if needed.
- The other part is to replace the first piece of the articulated Trek SLR garmin mount (made by K-EDGE) so I can mount it to the carbon sheet I made and also position the computer exactly where I want it.
Here’s the bike as it stands now;
I did take the aerobar angles from the native 21 degree down to 14 degrees using the -7 deg Trek spacer based on some comments in recent videos and past ST threads for aerodynamics.
But only way to tell which is best would be aero-testing; I do have the hardware needed to go back and forth.
After a lot of indecision for a rear disc, I ended up getting a Swiss Side Hadron Ultimate disc. Same exact disc as the DT SWISS one but a bit cheaper.
(ordered without stickers). I do not have a front wheel for racing yet, I just ordered a Vanquish Pro RC 60 with the Black Friday deals.


Here’s a good view of the cockpit customization with the carbon sheet holding the bracket for the Garmin computer and the BTA bottle spacer.
All screws are titanium, the whole setup is quite light!


This maybe shows better the color fade; In most pictures the dark blue appears to be black.

This bike is also my first bike that does not have 2-button shifters, can’t say I like being forced to the ‘synchronized shifting mode’ - I do not like it so far.
I got the parts to add satellite shifters to switch back to “manual shifting mode” for the FD - but I have yet to see if I can fit them in a clean and ergonomic way to the brake levers.
As I got the bike in mid September and passed more time tweaking it than actually riding it before the weather got too cold (to my taste anyway) to ride on the roads, I do not have many rides on it yet but looking forward to next spring.
(Is that enough pictures?) ![]()
Lovely looking bike, and good choice of colours. Biggest time investment for me was not choosing the fade colours, but the logo colour. I went mercury, so hoping that comes out as nice as yours did in real life.
And that front end does look super clean.
When you say you’re going to add the satellite shifters, how are you going to configure the buttons to shift - normal left shift for front changes and right shifters for rear, or are you going to use the two satellite for the FD and leave the ‘big’ buttons for the rear?
Beautiful bike. You really did a great job on everything. It is very well thought out. I love the Garmin mount and the aluminum hack job. That is really impressive you did it by hand.
Thanks! Hopefully she rides as good as she looks!!
Hi, can i ask what your grippers are please?
Hi, can i ask what your grippers are please?
Looks like he’s using those heat-shrink grips often offered for fishing rods?. Here’s an example below but there are several sellers/brands.
AMAZON_LINK

Sweet ride!
When you say you’re going to add the satellite shifters, how are you going to configure the buttons to shift - normal left shift for front changes and right shifters for rear, or are you going to use the two satellite for the FD and leave the ‘big’ buttons for the rear?
It can be programmed either way. He has the extra set up listed in the classifieds.
I setup my wife’s to work like the two buttons worked. Left is FD and Right is RD. Big buttons are higher gears.