So, I am happy to report that my tri bike’s makeover and weight loss is finally complete!


I started of with this (above)
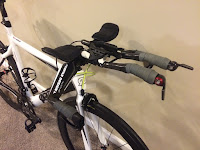
A 2009 Quintana Roo Lucero (Espada edition). I picked this frame up on clearance from RA Cycles last year for a cool $500. It is super aero and light (claimed 1100g for the frame). I raced it last year and it did well. My only dissatisfaction with it, if you want to call it that, is the weight of fork, which was like a boat anchor (1.34 lbs) and the color scheme, which was fine but not ideal. I had a nice cockpit setup with a Profile Design Svet base bar and Profile Design carbon T2 s-bend aerobars. But that set up, too, was on the heavy side since the parts were not integrated. Finally, I had an Adomo Attack saddle, which was comfortable on the jewels, but weighed almost 300g! I felt that I needed to do something different with the aesthetics of the bike and the weight of the bike.
The aesthetics were easy enough to change. I stumbled upon a product called Plasti-Dip. It goes on with a spray can (also have a dip-in form) and it lays down like a spray paint, but does not adhere to the paint underneath. Rather, it adheres to itself. For that reason, it is very easy to remove without damage to the paint underneath (I know, I tried after I sprayed a part and then changed my mind). It just peels right off and it is not heavy. It has a bit of a rubbery texture and is very good at protecting the frame underneath from the elements. All in all, it is essentially the perfect product for a bike makeover that you don’t know will be permanent.
The plati-dip can be a little finicky and delicate. For instance, my aerobar slammed against the frame during assembly. Rather than creating a chip in the paint, it took a chuck of plasti-off, exposing the paint underneath. No problem though. I just whipped out the spray can and sprayed that spot. It adhered to the rest like there was never any damage. No need to worry about sanding down or getting all of the layers just right!
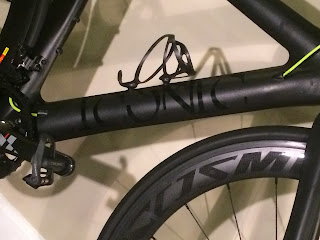
The Plasti-Dip comes in several colors, even cool lime green. I went with stealth matte black. That’s just what I like. All my bikes are now stealth black.
I also made a couple custom decals. I chose to call my new, homemade brand of bike “ICONIC”. I picked a cool font and made custom vinyl decals on the cheap from DIYlettering.com. I even inadvertently messed up my first attempt at the decal and they sent me replacements for free!
As a final touch, I used lime green housing. I love the black/lime green color scheme and added just a little touch of color to get the look I wanted.
Now for the weight loss… I changed a couple of things out as follows:
 1. I got rid of the stock boat anchor fork and changed it out for an Easton EA90 carbon tt fork. Light. The new fork was half the weight at 335g! It too got painted stealth black to match the frame.
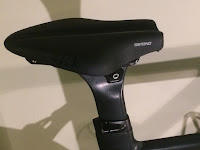
 2. I changed out the Adamo saddle at almost 300g in favor of a Fizik Tritone. I’m a huge fan of the Ariones (that’s all I ride otherwise) and this is essentially an Arione with the nose cut off. It comes in at 220g.
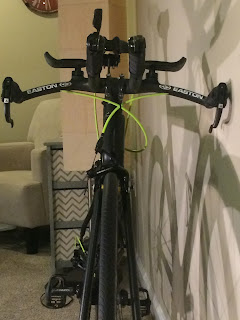
 3. I swapped out the Profile Design cockpit for an Easton Attack TT integrated carbon cockpit. This setup is LIGHT! Rather than 500-600 grams for the other setup, this one is in the 300gram range. It keeps things neat and tidy with a lack of hardware. One issue I had in the conversion was the lack of adjustability of the cockpit setup. I needed the armrests to be higher. Fortunately, it came with one set of aero spacers. I had another set lying around from the last time I used this particular aerobar setup. To get a little higher yet, I used spacers from my Profile Design bars which just happened to fit the setup. Although it was slapped together from some random parts, it got me to where I needed to be height wise and I think it is still light and aero!
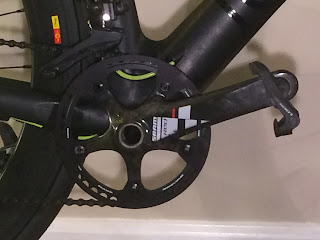
 4. One of the biggest changes I made was going from a two chainring setup to one. Rather than the heavy 53t chainring on the outside (128g) I opted to use a super light bbg chainring (28g). I almost never use the large chainring. During my half IM last year, I didn’t use it one time; so why carry the extra weight. I kept my front derailleur on as a chain catcher and went with a 44t small ring rather than the 39. This should give me just a little bit more on downhills and flats i.e. those few times I may have wanted to shift up to the big ring for a little more.
With those changes having been made and the addition of the plasti-dip, the total bike went from 18.02 lbs to 16.76. It is markedly lighter and may I say that I think it is much more bad ass than the last version. It just looks faster now. I can’t wait to ride it!