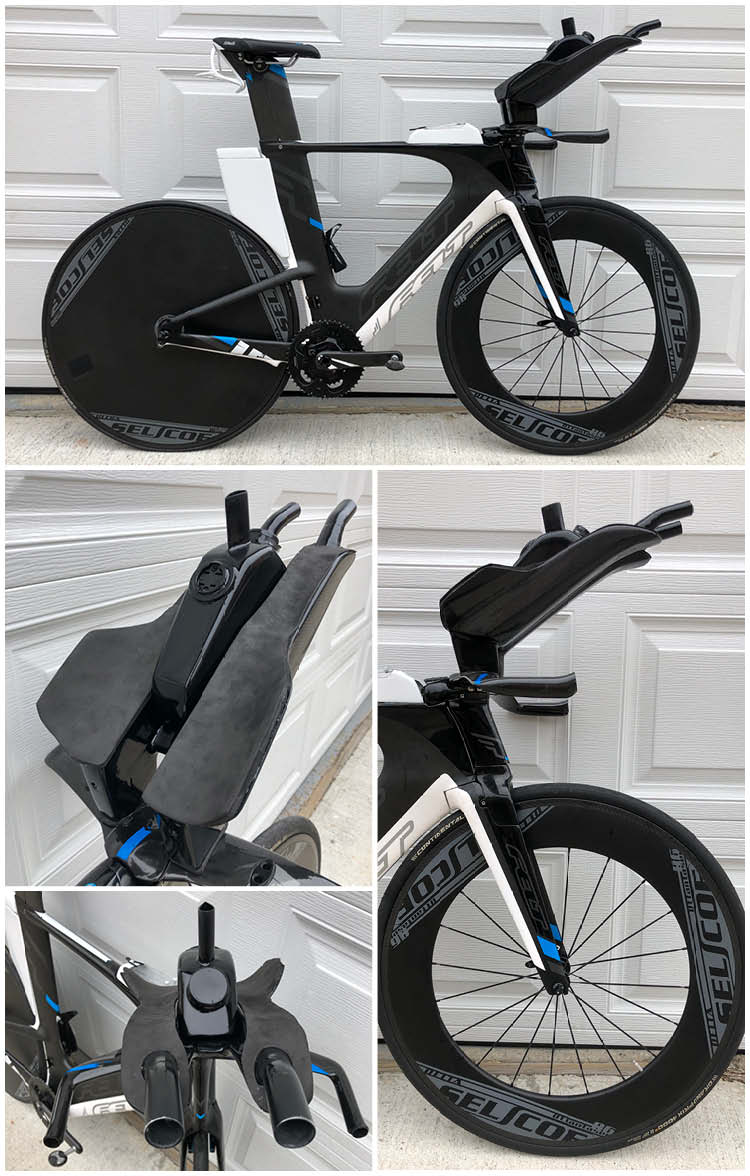
The goal with this project was to get my hands up higher and tuck my head a bit lower, while also being able to roll my shoulders down and inward. Also, the new bars needed to integrate hydration, mount a Garmin and hide Di2 wires (still on order). The hydration “box” needed to be removable for cleaning, as well as refillable on the fly. This is the process for how I made this custom/one off part, including the design, sourcing, shaping, carbon layup and finishing.
On this bike, I also made a custom Cal-Pack (bento) and Tail Box. The process for those can be found in my previous post: https://forum.slowtwitch.com/forum/Slowtwitch_Forums_C1/Triathlon_Forum_F1/Making_my_own_bike_parts_-_Quarantine_edition_P7245330/?search_string=quarantine#p7245330
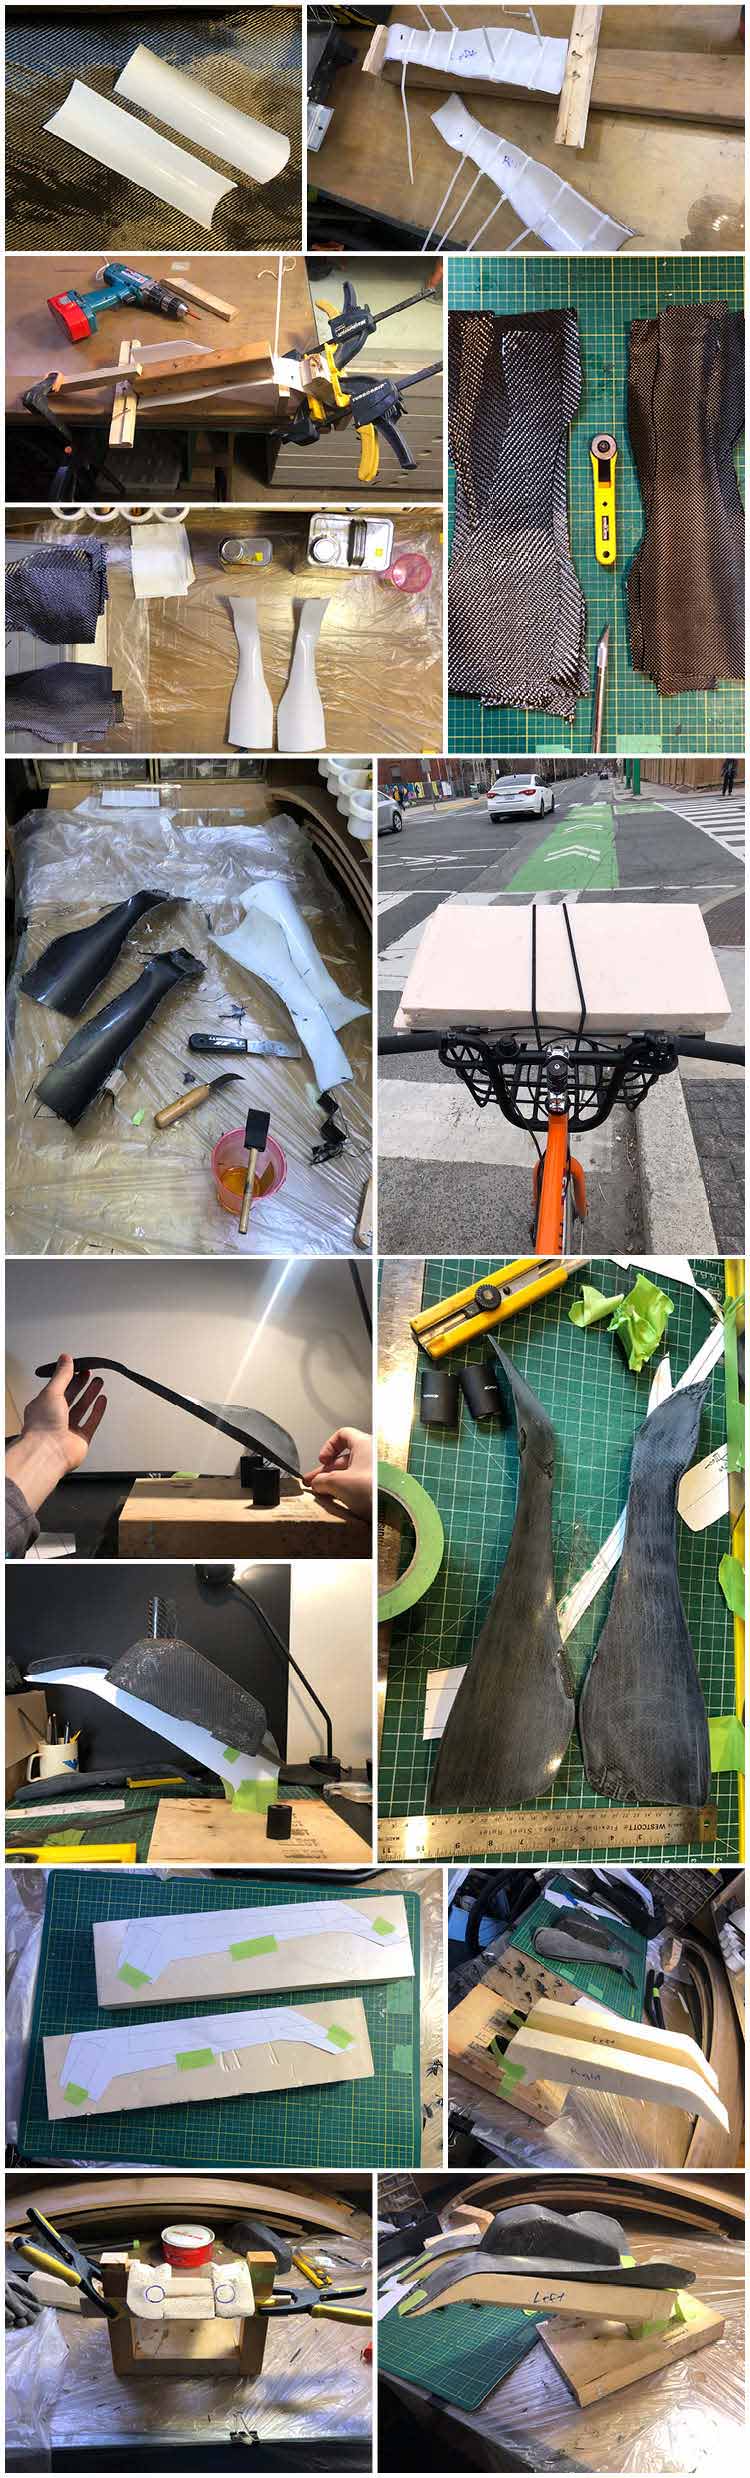
First, I shaped a sheet of plastic to fit my forearm and wrist. This was trimmed down to a rough arm shape, leaving lots of extra (just to be safe).
These arm molds were covered with five layers of carbon, put in a vaccum bag and cured for 24 hours.
One of the challenges of creating the shape of the bars was how I was going to mold them. I decided to use a light-weight foam insulation as a “plug mold” to then layer carbon onto.
Since I only needed a small amount of foam, I didn’t want to purchase a full sheet (always trying to be frugal). I headed out (by bike) to search some dumpsters for construction waste, and hit the jackpot on my 3rd stop.
The foam is easy to shape with hand tools. I used a hand saw, rasp, file and small band saw to whittle the pieces down to the shape I needed.
This is probably the most important part of the whole process. The foam has to be the right shape to get my arms in the right position. The angles all need to be exact. Because these bars are built to be a single piece, there will be no way to adjust them once complete. I had to make sure the length, reach, width, rise and every other measurement was correct.
It was important to think several steps ahead before the final assembly. One important detail is to run some tubing inside the bar for cables/wires to pass through.
I used a portion of my old extensions for hand grips. These already had a good curve and kept me from having to try to make my own. These were bonded in place and reinforced in a later step.
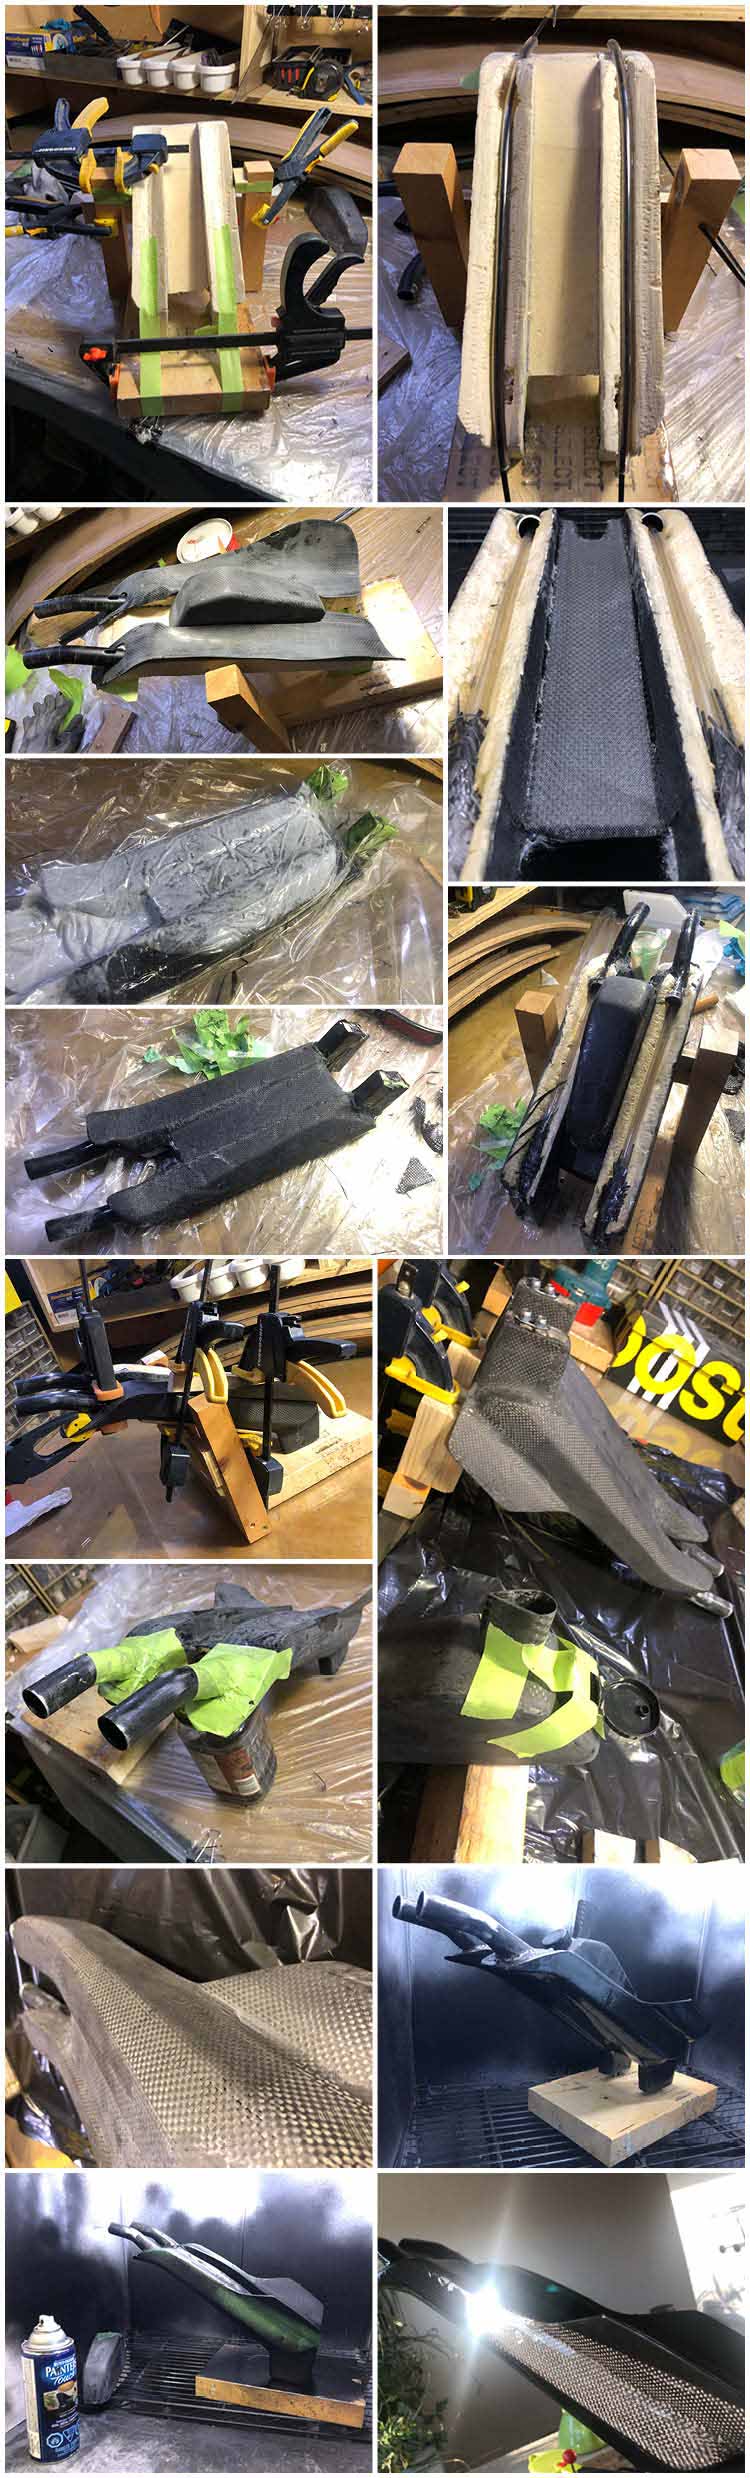
Now, I get to lay the layers of carbon on all the faces and surfaces. There are three main areas: the chanel where the hydration box sits, the front fairing and the legs or risers. Each of these areas needed a different cut of carbon and quantity of layers. All in, there are about 50 unique carbon pieces.
These layers are each added and cured or 24 hours in a vacuum bag. Sometimes you can lay several layers at once, other times they need to be done one at a time.
The last parts to get assembled were the arm rests to the base/fairing and laying carbon sheets across them (essentially creating a single foam core carbon part).
The bars and hydration box got sanded and finished with deep black and raw carbon areas to match the existing paint scheme of the bike.
All in all, these took about 100 hours of work over 4 weeks. Material cost: $100. My labour: Free
Lessons learned/modifications for next time:
• Try to remove foam and leave just the carbon shell to reduce weight
• Minimize size and materials as much as possible
• Integrate hydration into the hollow bars
• Order parts well in advance to have on hand during build
It has just been trial and error and understanding where the stress points will be. This is the first part I made that will be load bearing (all other projects have been accessories). These bars are over-built to ensure they are super strong, but are also heavier than they could be (just to be safe).
Quite an amazing project! Won’t the internal foam dissolve with acetone or something similar? However, I can imagine that leaving the foam in there actually strengthens the whole part, since it connects all sides together.
Very impressive. Would the project have been much simpler if you would have just designed ‘arm fairings’ bonded onto existing extensions?
Kind of like adding orthodics to a shoe rather than making a whole new shoe. I understand that wouldn’t have met your need but could be an more accessible way to play with shapes without having to go whole hog on the custom brackets. It then also opens up the potential of 3D-printing rapid prototype shapes for testing on trainer before doing a final product out of carbon.
I thought about dissolving it but also worried about damaging the carbon or resin. It was so light I didn’t bother on this version, but the next one I will make it a “removable” mold by covering it with packing tape and waxing it with a release agent. One good thing with keeping it in is it will dampen the road vibration and could make it a bit stiffer too.
I’d do a couple of hanging weight tests from the ends before I went on the maiden voyage I used almost exclusively uni on mine, but weave should be good with enough layers.
You got it. I didn’t have the position I wanted with the old extensions. I did know exactly what position I wanted and just had to make sure I got that right. I don’t have the knowledge to 3d model or the access to 3d printers so that wasn’t an option in this case. I also prefer the method of using my hands and eyes to figure things out. If they were to be in production for others cyclist then it would need to be a lot more repeatable though.
I have fully tested them, they are plenty strong (maybe too strong). They are also too heavy because of being over built. But that’s prototyping, you go to school on the first one.
Ill try to get a better shot of the front for you. The bars measure 21cm at the outside of the elbows, 16cm at the wrists an have a 16cm rise.
Certain parts could be printed, the hydration box for example. I’d think keeping them carbon will (eventually) allow them to be lighter but still allow for customization. But I could be wrong with that. 3d printing also requires more technical knowledge and specific machinery, neither of that I have. Anyone could make these with about 5 tools and some spare time.
Not sure what you mean with the straw. The small carbon part in the photos is part of the bottle to hold a straw (some simple rubber tubing). It will get fitted once I ride this a bit and determine how long it needs to be. The filling port is the lid off my Honey Mustard container though ;).
I have thought about adding windshields and such. This seems more like a HPV record thing though. What are the rules in triathlon around this? I would think they would be banned?
"
(e) There must be no protective shield, fairing, or other device on any part of the bicycle (including frame, wheels, handlebars, chain wheel, and accessories) which has the effect of reducing resistance. Aerodynamic carriers for food, water, and or cycling provisions may be attached to or be an integral part of the aero-handlebars if they meet the following guidelines:
(i) The carrier can pass from front to rear, through a rectangular loop with dimensions of 10 inches (25 cm) in width and 8 inches (20 cm) in height. (ii) The front of the carrier is behind the cyclist’s hands when the hands are placed in their customary position on the end of the aerobars, and (iii) the length of the carrier is no greater than 10 inches (25 cm) front to rear.
When the carrier is an integral part of the aerobar, this integrated unit must be able to pass through the rectangular loop defined in (i) above and the carrier portion of the unit must meet criteria (ii) and (iii). In the event that compliance with this section is in doubt with respect to any particular carrier or integrated unit, a member of USA Triathlon may submit the carrier or integrated unit to USA Triathlon for evaluation.
(f) No additional equipment, whether it is worn under the competitor’s clothing, over the competitors clothing, or is otherwise attached to the athlete’s body, which has the effect of reducing wind resistance is permitted. An exception is the use of safety helmets as described in Section 5.9. Such helmets may have the effect of reducing the wind resistance of the head only.
(g) Except as otherwise determined by the race director in the interest of safety, the front wheel may be of a different diameter than the rear wheel, but the front wheel must be of spoke construction. The rear wheel may be either spoke or solid construction. Wheel covers shall only be permitted on the rear wheel."
I think I’m ok on the fairing part, and the carrier part. But that does look like no windshields. My next project was to make a cover for the chainring, so that might be out too.