I’ve wanted a bento box for my Kestrel for quite a while now, however I did not want a mesh bag or soft case that is a “universal fitâ€. I wanted something light and solid, that looked really nice and fit the shape of my top tube (which has a slight rise towards the headset) and the angle of the headset. I don’t like zippers, I do like lids; a closed quarters box kind of like the storage in a Felt IA.
Big shocker! Doesn’t exist that I could find for my bike. The Torhans came close with the angle however since my top tube has a slight rise leading to the headset and stem, nothing would sit flush – there would be a gap beneath the box. No options I could find dealt with the design of my top tube.
Bored on a Saturday, I stopped by Lowes.
I give you an 8 dollar DIY bento box, made from 1/8 inch bonded thermoplastic rubber and customized to fit YOUR bike.
Here’s what you need. Most would have this around the house minus 7 and 8:
Cold beer (2 at least)
A ruler. Right angle preferably, however a piece of cardboard with a pen and common sense works at worst case.
A pen or sharpie
A piece of cardboard
Box cutter / razor
5 zip ties
(From Lowes) – Item 37505, Model F40CT1P001: Flexco 4in x 4ft Dahlia Thermoplastic Rubber Wall Base ($2.35 each, multiple colors to pick from)
(From Lowes) – Item 771629, Model 01558: DAP RapidFuse All Purpose Adhesive ($5.48 a bottle)
Step 1: Open a beer.
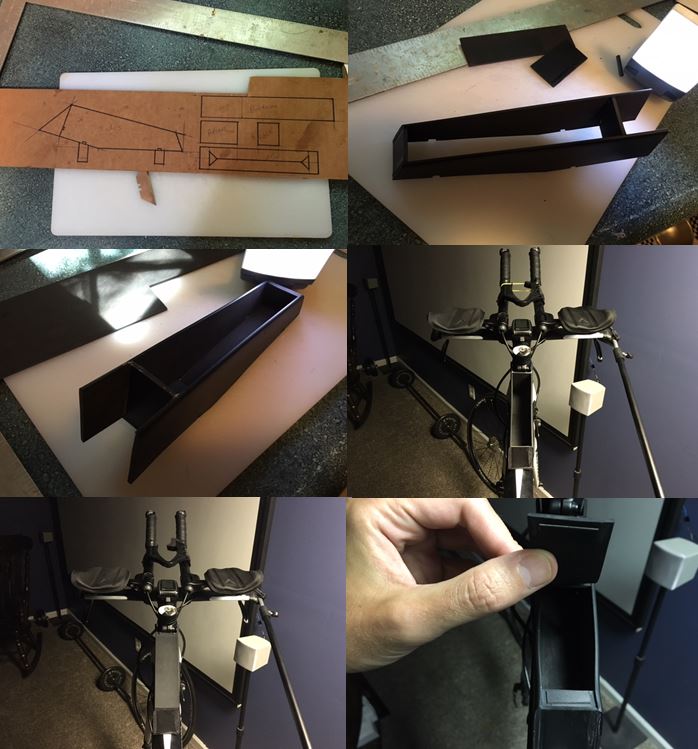
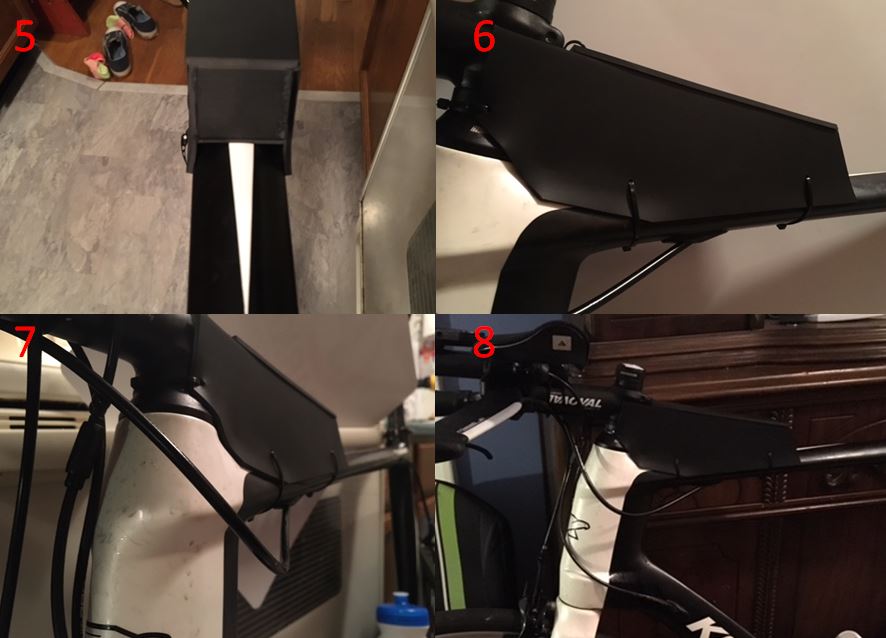
Step 2: Start taking measurements of your top tube. Find its width, decide the length of your box (my box is around 7 inches. Mark any angle adjustments, for instance on my Kestrel the rise of the tube nearing the headset. Note the angle of your headset in comparison to the top tube so the front of the box can sit flush. Decide on a height, likely determined by the height of your headset and stem. After you finish, measure it all again.
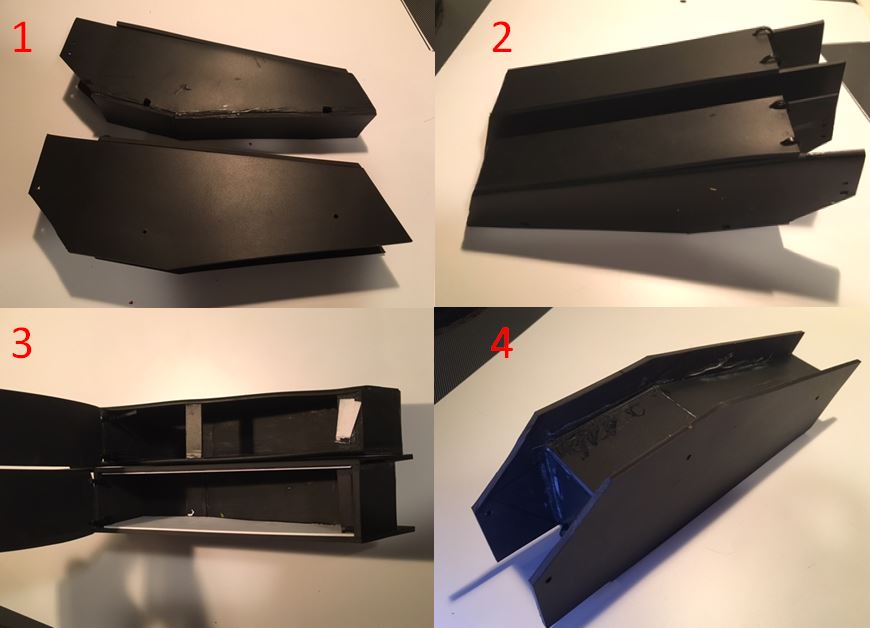
Step 3. Grab your ruler, design the sides first on the cardboard, and make sure the SIDES ARE LONGER THAN THE ACTUAL BOX STORAGE – the idea is that you want them to surpass the back of the box and hug the sides of your headset, measure out this distance. Eventually they will be fastened, these hugged edges protect the abrupt back end of the box from taking wind directly. My attempt at maximizing aerodynamics even though this will all be hidden behind the headset. All other parts of the box but the lid(front, rear and bottom) will fit inside of the sides, so take this into consideration when drafting those other parts (1/4 inch of the complete box width will be accommodated by the width of the rubber on the sides)
Step 4: Cut out the cardboard, tape it up, put it on the bike – how’s it fit? Go back and fix what is needed.
Step 5: Attend to your beer.
Step 6: Using the cardboard cut outs, stencil the designs onto the wall base. One side appears finished, one is more of a grey matte. Pick what you want to be in and out, then keep in mind what side will be showing when you stencil.
Step 7: Carefully cut out the rubber pieces with the box cutter using the ruler to guide the blade.
Step 8: Cut a couple of rectangle slits into the bottom of the sides, same spot and equal size on both the left and right, one near the back and one near the front. This is where you will run 2 of the 5 zipties to secure the box to the frame.
Step 9: Start assembly via the DAP bonding glue. This stuff sets in 30 seconds, a little goes a long way. Get it right the first time, hold it in place for half a minute, it will be strong enough at that point to hold itself. Glue / Bond everything together but the lid.
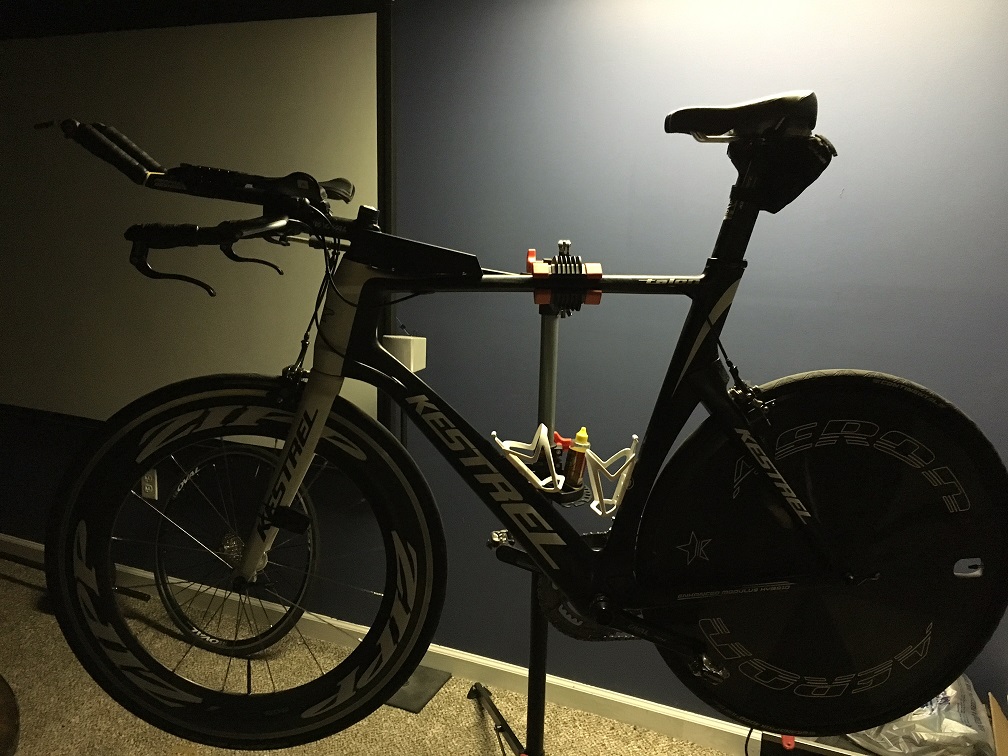
Step 10: Once assembled, put it on the bike and make sure it’s a perfect flush fit. Make adjustments as needed. Take it back off the bike.
Step 11: Second beer, let it cure for a while.
Step 12: To secure the lid, I put a couple of small holes in the back of the box and equally on the back of my lid. Took 2 zip ties and ran them through to create 2 hinges with the tie lock on the inside of the box. Doesn’t need to be super tight, you want room for the lid to be able to open and over tightening will cause deformity in the shape of the lid, it won’t sit flush. The lid itself stays down and doesn’t open, however to secure a locked position I took a fridge magnet from a local pizza joint and cut a couple small squares. Glued one to the lid towards the front, glued a small cross beam of rubber inside of the box and glued the other magnet there. The lid does not budge and is very easy to access, worked great. Check the polarity of the magnets before gluing them down, make sure they are attracting one another.
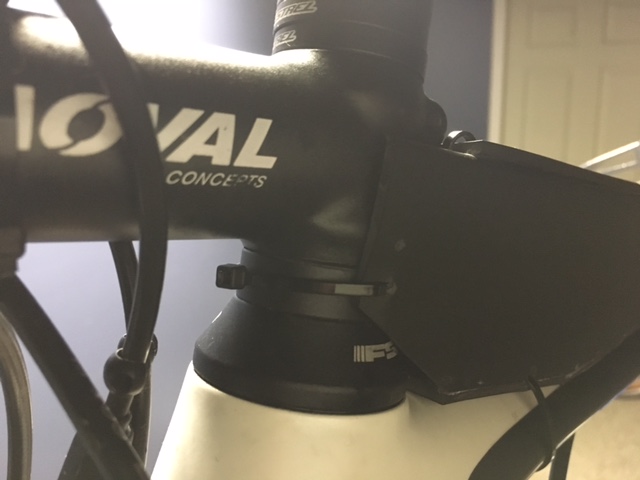
Step 13: Cut a couple of very small slits into the extended sides that hug the headset, this will be the 3rd mount location to secure the boxes position. Be sure to measure where you are making these slits so that the tie will sit around a smooth part of the headset, not where a bolt or stem screw may sit.
Step 14: Mount the box by first running a tie through the extended sides of the box with plenty of slack between the extensions. Pop it on the bike, secure the zip tie then start tighting it up. This mount is not there to secure the box to the bike so do not overtighten. When the headset turns, the tie should not. This mount merely locks the box in its place forward not allowing it to slip back on the top tube as you ride. DO NOT OVER TIGHTEN. Cut off access tie material.
Step 15: Run 2 ties through the slits you made on the bottom of the sides to secure the box to the top tube. You can tighten these down pretty good, but too tight on an oval shaped top tube and you will cause bowing outwards towards the tops of the sides. Easy fix to this, glue in a second cross beam of rubber inside of the box to maintain structural integrity. I had to for the Kestrel.
And that’s it.
Sweat all over this thing. It can take a beating, those bonded edges are exactly that, BONDED. It’s not coming apart. Easy to clean, cheap, aero. Looks pretty cool. Does its job. I fit my keys, handful of salt pills, 1 bar and 1 gel on the test ride and still could have stuffed a few more gels in there.
Had a blast building this. DIY!