I’m in the beginning phase of making a bookcase. I already purchased the wood and I know what size it’s going to be .
I’m planning on sanding it and most likely staining it as well. So that leads me to a few questions…
should I sand the individual pieces or wait until it is a functioning bookcase?
similar to the sanding, should I stain the pieces or wait until it is complete?
any suggestions of stains? brand, color?
what about screws?
thanks for the help
-----okay. It’s now a week later and the construction is all done. I think it looks pretty good and in reality, it stands so how could I be disappointed…Keep in mind it’s been about 7 years since I was in 9th grade woodshop and that was the last time I’ve attempted to construct anything from wood. Needless to say, I’m pleased. It was a lot of fun and makes me want to make some more stuff. I had some wood overflow in certain section and the top shelf is a bit off so I will probably get some wood filler and get that all set up. I was going to leave it the way it is, but I’m thinking that I may stain it after all. Photos below… sorry, HUGE pics
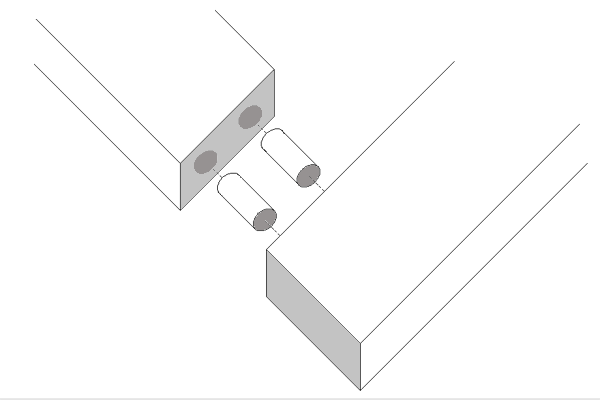
I’m not sure if you want to only use screws… If you don’t have biscuit cutter, I’d drill holes and also glue with dowels. I made a bookcase several years ago with ONLY dowels and glue and it is as solid as a rock still after being moved several times. Screws only will likely fall apart with soft wood like pine. On the sanding, I’d do surface sanding before assembly but sand joints after it is assembled… Stain after it is assembled.
I agree with, what jtaylor said.
Sand before to get the boards themselves smooth, then touch up the joints when they are there.
Stain after making it, that way the wood glue won’t be as obvious if some if it was squeezed out of the joints/contact points.
Boiled linseed oil (spelling not sure, but I know I can get it at Sears Hardwood) you just wipe it on with a cloth, let it dry. VERY nice finish IMO and it’s natural, i.e. no unhealthy solvents to inhale, and the smell isn’t half bad. It is also a middle of the road kind of finish.
PLEASE do not use screws! Screws are crutches, not a way to make a nice piece of furniture. Use dowel pins like jtaylor suggested, along with some wood glue your shelf will be solid!
okay, I’m open to the dowel idea, but I don’t have any idea how to go about doing that. Can you either tell me how to do it or send me to a site online or directions.
If you haven’t done it, experiment with some scrap wood first. It can be tricky aligning the joints but it is completely possible without a drill press. You might try a dado as well if you have a table saw.
Again what jtaylor said. Again I would like to add something though. You don’t have to get a doweling jig. That can be done much cheaper with the same result if you’re careful.
Instead of a doweling jig you can get these usually metal pins, they come in a of 4 different diameters, you put them into the holes drilled in the one piece of wood and press it against the other piece of wood. There’s a small bump on these, similar to the guiding tip of a drill bit, that makes a small indentation in the other piece of wood. This is then the point where you just drill the whole you want. It’s probably a around $5 at the most at HomeDepot. I hope that made sense, I’ve used these (unfortunately the name escapes me) and the resulting furniture looks good.
sand before and after assembling. rough sanding, final sanding (220 grit) after assembly.
Stain and finish after assembly.
Pine can become very splotchy when stained so a pre-stain clear coat is usually a good idea. This stuff is usually called a “sanding sealer”. You can buy it, or use a 1lb cut of shellac. Any oil based stain will probably do what you want. Try it out on scrap first (including the sanding-sealer) step. I despite the Polyshades stuff that tries to mix in the finish with the stain. After the stain is dry, finish with a couple coats of polyeurethane. The water-based stuff is pretty good and doesn’t smell like the oil-based.
what about screws? Depends on your construction. I’d use dados and glue. Cutting a dado will take a table saw or a router. How were you planning on using the screws? Through the sides and into the endgrain of the shelves? I’d be concerned about the wood splitting, plus it’s not a great joint. Have you thought about 1x2 ledges on the side to hold the shelve? Holes going up the side to put in those little pegs to hold adjustable shelves?
Are you adding a back to the unit? (It’ll help prevent side-side racking)
A 30" span isnt’ too bad, but you may want to throw the numberes through the Sagulator (http://www.woodbin.com/calcs/sagulator.htm) to make sure you won’t get too much sag. It all depends on what you plan to put on the shelves.
Another option depending on how you weight looks / strength / ease of build. You could route dadoes and slide the boards in. You could screw in cleats, and put the shelf on that. Pins on the side so its adjustable.
Oh ya sand first, assemble, remove glue that overflows (before it dries), sand joints, Stain (might want to put a pre-stain down for a more even finish on pine).
I like the idea of using dado’s and dowels, but I don’t have the tools for that. I don’t have access to a table saw, router or anything like that.
“you could screw in cleats…”
This might be my most sensible option. Would this require any major tools beside a screwdriver or drill? Those tools I do have. I’m assuming I can just go to the hardware store and pick them up.
Oh yea, I have an extra piece of wood that I was not sure about using; it’s a 1" x 2" x 6’ . Would it be possible to just screw that into the side walls and then lay the boards on top of that or would I need to dado/dowel those in as well?
Using the 1x2 as cleats should be fine – that’s only a drill and driver. Should be enough for 3 shelves. Screw in 1x1/4" screws from the inside (to keep the outside looking nice). I’d predrill first too, just to avoid splitting the 1x2s.
Tip: prior to assembling, line up the left and right sides and mark the location for the cleats. This way they’ll be in the same spot.
I’d also tack (as in nail, not screw) on a piece 1/4" plywood to the back to keep the whole thing held together well.
You might want to reconsider the pine. Beginning wood workers tend to use it because it’s cheap and available at the nearest Home Depot. What they don’t realize is that it’s actually pretty hard to work with and doesn’t take finish very well. You might want to try poplar or even oak instead…
I second the comment on using Pine. Doesn’t finish well if you want any grain showing. Plus being a soft wood it is prone to damage easily. Oak is probably your best bet.
Sand everything you can before assembly and touch up as needed after assembly.
Stain and finish after assembly. That ensures penetration into all corners etc and provides a consistent finish.
For the actual finish I highly recommend General Finishes Seal a Cell and Arm R Seal. You can pick them up at Woodcraft is you have one local. The Seal A Cell comes in colors and 1 application should suffice. For the Arm R Seal I use a soft rag and apply multiple coats allowing to dry overnight. You can get gloss, semi, or flat. These products are a blend of tongue oil and poly. I have several pieces of furniture that I have built using this product and will never sway to another.
Some sort of joint system should be utilized instead of screws or along with screws. Also a quality wood glue will go a long way in keeping everything solid. Gorilla Glue is extremely strong but you have to be very careful to not get on exposed surfaces as it won’t take stain.
Good luck with your project.
Reminds me I have an oak bed 1/2 finished that I need to get cracking on.
We used birch plywood on our bookshelf project a couple years back, and I’m really happy with how the look of the wood turned out. We really didn’t have to do much in the way of finish.
Well, I’ve already taken up, played too seriously, and given up on golf.
I’ve spent too much money on bikes already.
Why not throw a little wood in the mix…
I know what you mean though, woodworking looks expensive. I used the cheapest wood I could find without cheapo plywood or anything like that and it came out to about $50 for just that small bookcase.
I started with power tools, router, biscuit joiner, etc. and lately have been doing mostly handwork. Cutting dovetails with a handsaw takes forever but it really is gratifying when they come out nicely. It really has made me appreciate the art and craftsmanship of fine, handmade furniture. Plus, a few good hand saws are a heck of a lot cheaper than power tools.
It really is a great hobby. Check out www.finewoodworking.com probably the best woodworking site out there. The forum is excellent. Not quite as lively as ST but just as informative.