Login required to started new threads

Login required to post replies

The ultimate DIY disc wheel cover how-to thread.
Quote | Reply
I'm cheap...and I like to tinker. Okay, now that that's out of the way we can get down to business.

In preparation for IMAZ this year, I decided I wanted to run a wheel cover in the rear. I'm on a severely limited budget, and since I wanted to get new tires as well, a WB cover would have been a stretch. I started reading old threads on here about making your own and figured I'd give it a try.

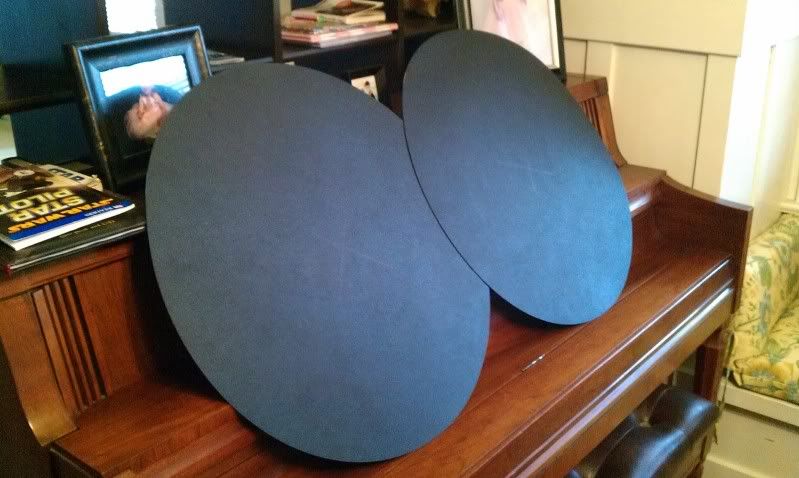
Lucky for me, here in SoCal, a quick search led me to a place in Anaheim called Industrial Plastic Supply. Not only did they have .040 thickness ABS sheets, they can also cut to size. Odd sizes are more expensive, but after measuring my 30mm deep training wheels, I figured out a disc with a diameter of 23" would be perfect. The best part? It was cheap. Like $13 a piece cheap. So I placed an order with Miguel (great guy) and the next day they were ready for pick up.

So lets get started.
Here is a list of things you'll need.
ABS discs
ABS Cement
Sharp cutting tool
Straight edge
Sandpaper
Painters tape

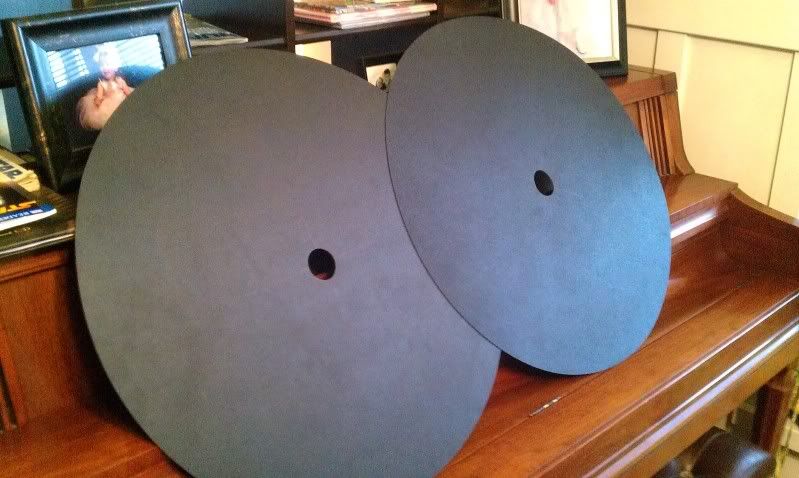
Here's the discs after I picked them up:


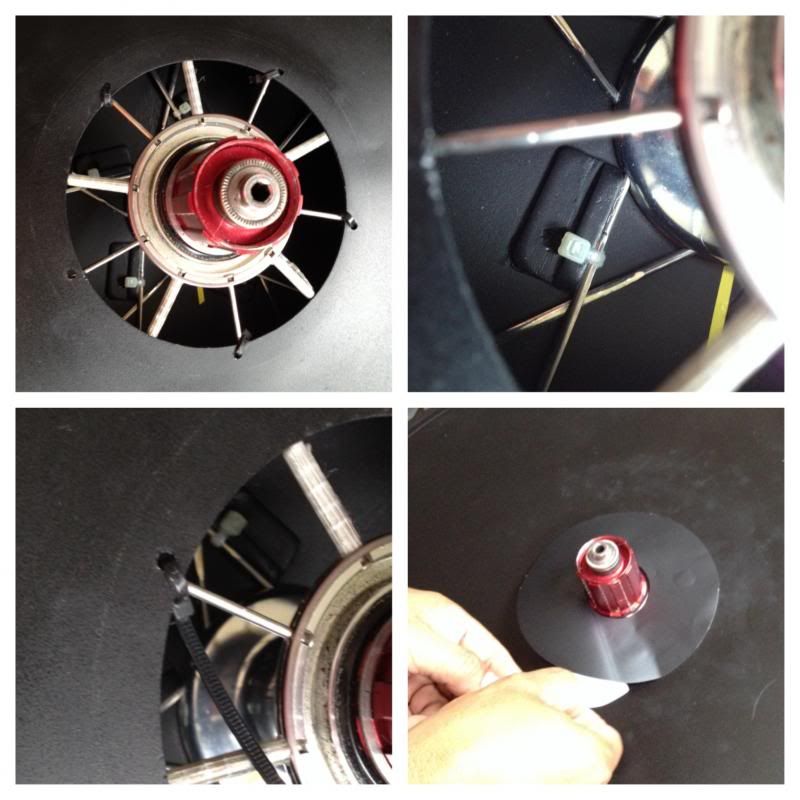
Next step is to cut your center hole. This depends of your hub, but I found that 1.5" worked well on both sides of my wheel. I used a hole saw in my drill, but you could use anything really.


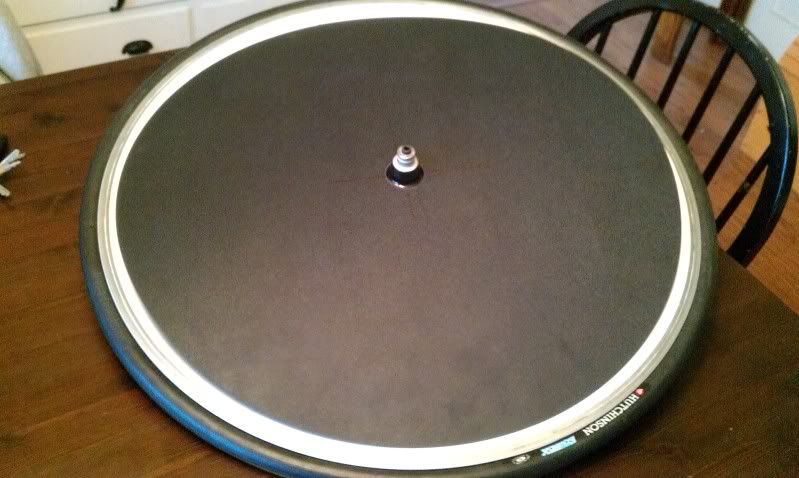
This shows you why you have to dish the disc properly to make it fit the dish of the wheel.


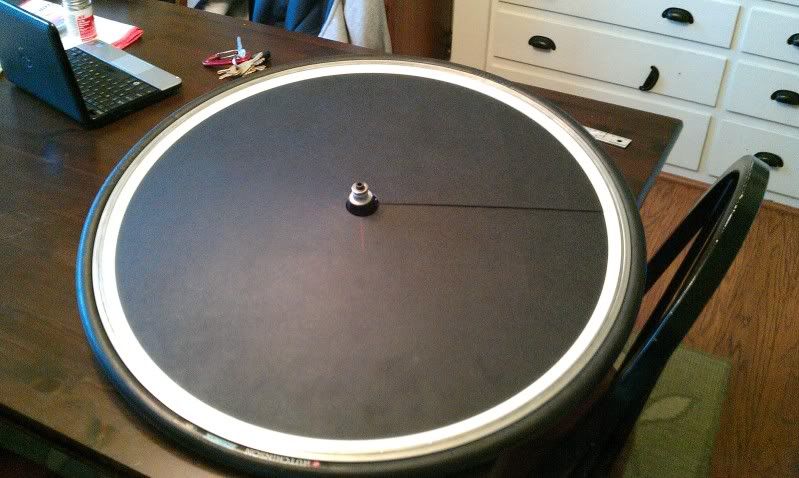
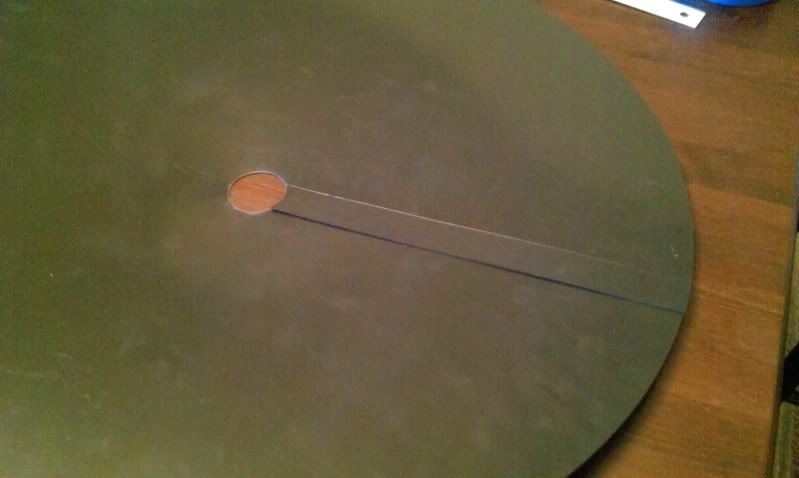
At this point you need to cut a straight radius from the center out to the edge. This stuff is really easy to cut. Just use a sharp edge to score it a few times, and it will snap cleanly.


With the radius cut, it will automatically overlap and lay perfectly flat when you put it on the wheel. At this point I suppose you could just tape it as is, but that wouldn't look very great IMO.


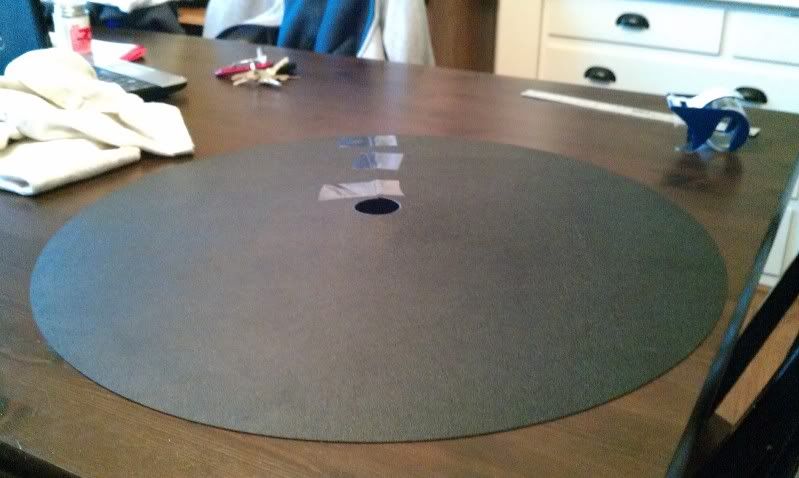
At this point I taped the overlap down and used the raised edge as a guide to cut the other side of the pie shaped piece. On the non drive side, this piece is quite a bit larger than the drive side because of the greater dish.


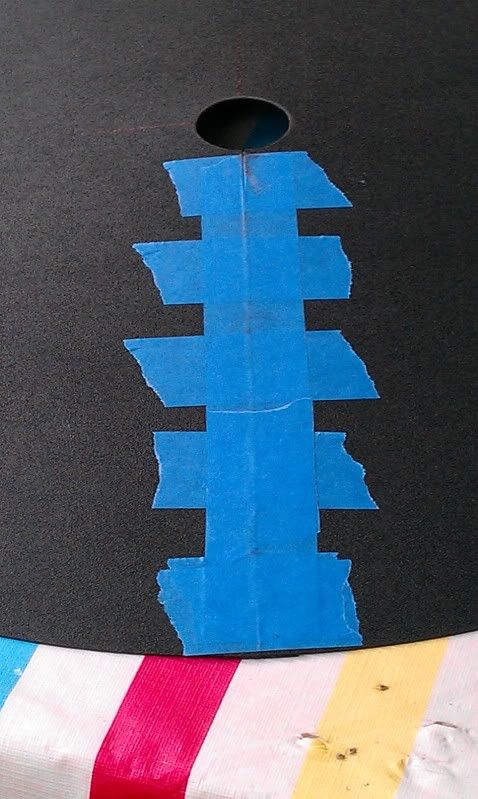
Here it is all taped up and ready to be bonded back together. I put the tape on the outside surface so it would keep the cement from bleeding through.


I used another scrap piece of ABS to make two strips that would be used to make a stronger joint.


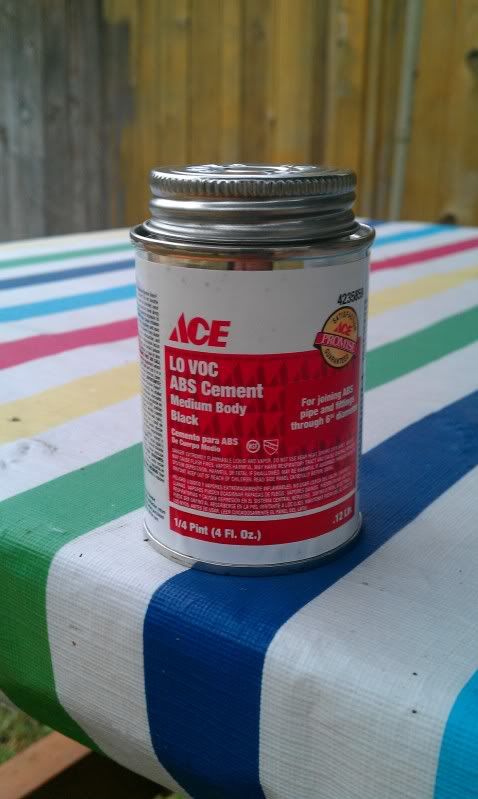
This is the cement I used. It's used for ABS plumbing and it's main ingredient in MEK which basically melts the two pieces a bit and then bonds them together permanently.


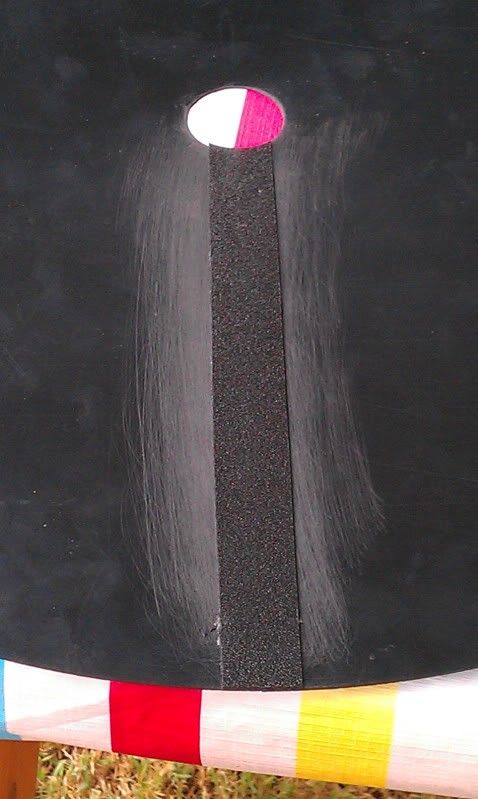
I scuffed up both surfaces with sandpaper to get a good bond. Then I bent the seam backwards to open it up and smeared a good amount over the gap. Then I popped it back the right way and put a good amount of cement on the back of my support strip, and laid it down. A good way to get a better bond with this stuff is to wiggle the pieces back and forth on each other. Then you just hold it in place for 30 seconds or so, then leave it for 2 hours to dry completely


All glued up and taped till dry:


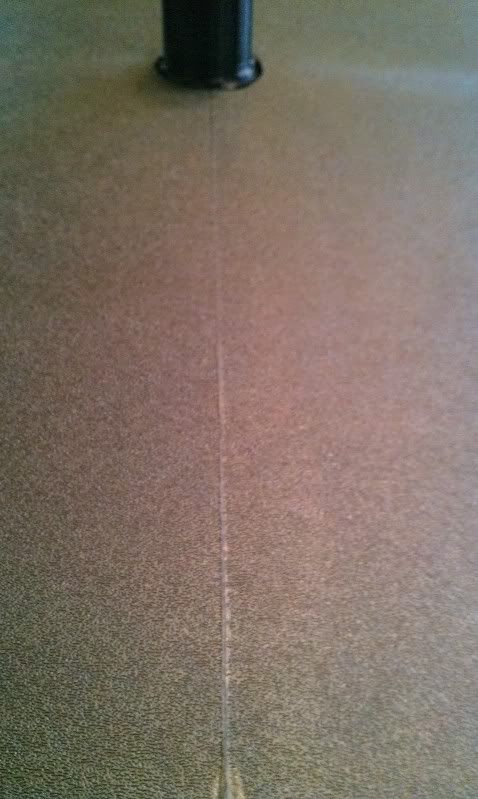
Here is a shot of the seam. For my first try it looks pretty good I think. I plan on putting some graphics on this when I'm all done, so no biggie.


Drive side taped down. I was thinking of buying some nylon post screws, but I think this looks cleaner and seems to be a rock solid hold. Used 4 small pieces to hold it in place, then used one continuous piece to secure it.


I used some packing tape on the inside to help secure it. Don't think its really needed though.


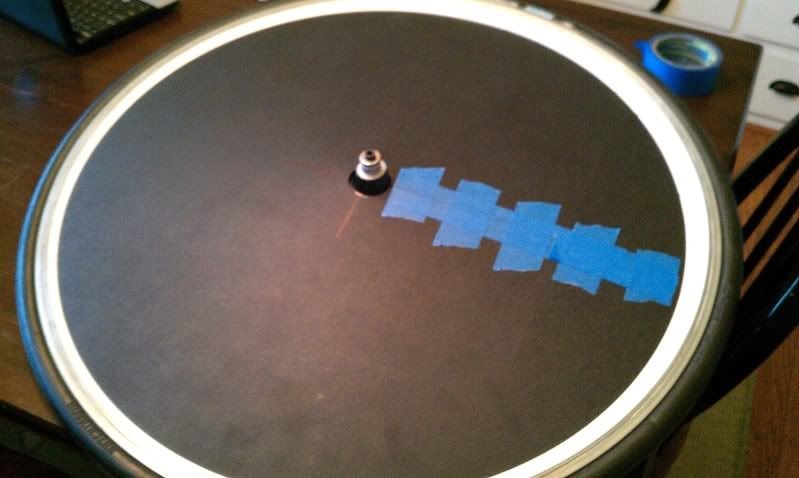
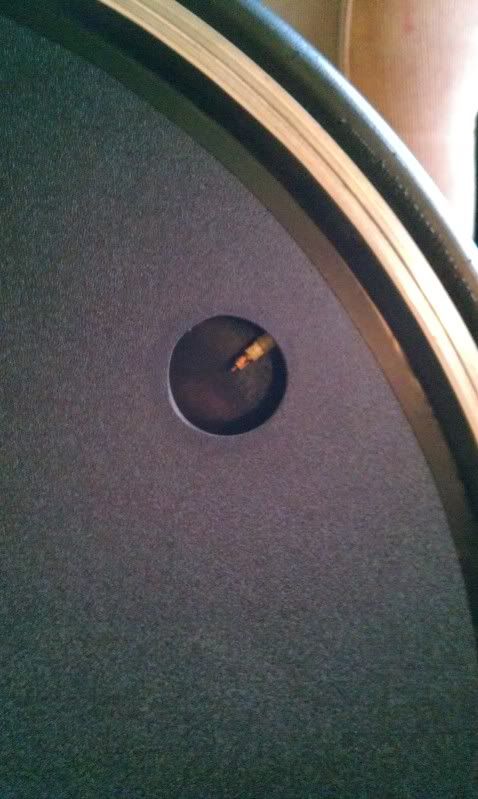
Cut a hole for the valve. I'll probably get a crack pipe so I dont have to make the hole bigger for my floor pump. (C02 head fits here no problem)


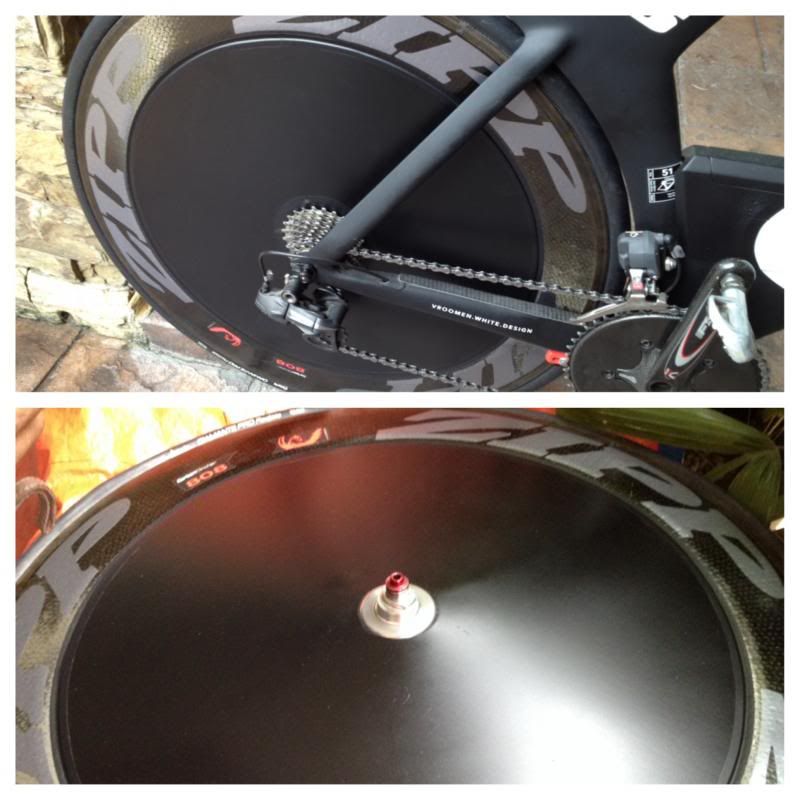
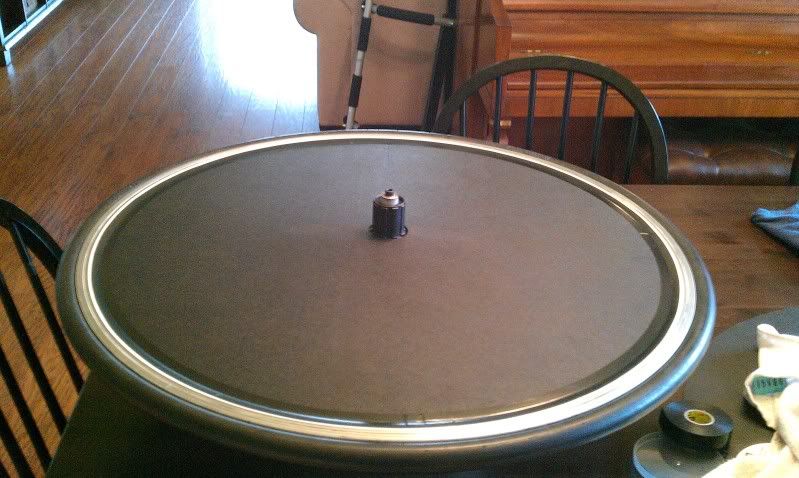
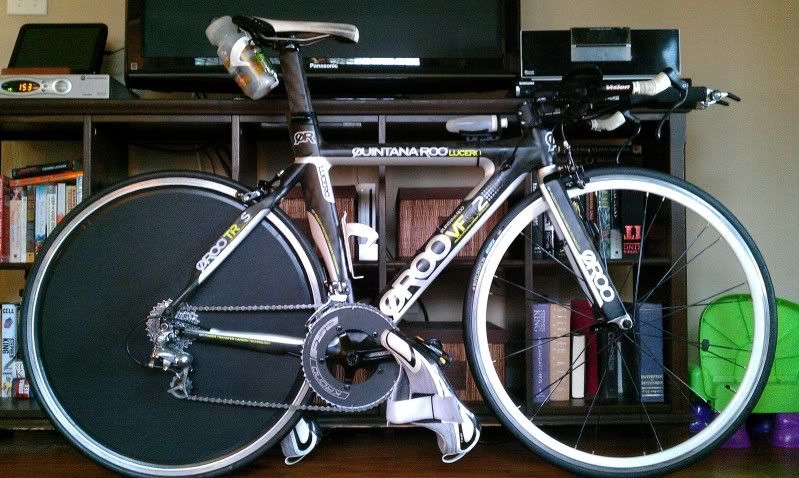
On the bike. There are absolutely no dips or distortion of any kind.


There you go. I just did this today, so I'll report back after some training and I get the graphics on there. Hope that helps somebody.
Quote Reply
Re: The ultimate DIY disc wheel cover how-to thread. [undertheradar] [ In reply to ]
Quote | Reply
Quote Reply
Re: The ultimate DIY disc wheel cover how-to thread. [undertheradar] [ In reply to ]
Quote | Reply
Wow. How light is that disc?


Last edited by: Jamaican: Sep 28, 11 14:10
Quote Reply
Re: The ultimate DIY disc wheel cover how-to thread. [undertheradar] [ In reply to ]
Quote | Reply
Awesome write-up! Too bad I just dropped coin for a Wheelbuilder cover a couple weeks ago. I look forward to DIY'ing my next set though! WOuld you say the .04 is about the right thickness? Looking back would you rather have thicker or thinner material?
Quote Reply
Re: The ultimate DIY disc wheel cover how-to thread. [Tyrell] [ In reply to ]
Quote | Reply
The .040 is the thinnest they had readily available, but it seems perfect. Any thicker and it would be heavier, and any thinner and it would probably be too floppy.

Not sure on the weight since I don't have a small scale, but it seems pretty damn light.
Quote Reply
Re: The ultimate DIY disc wheel cover how-to thread. [undertheradar] [ In reply to ]
Quote | Reply
I've been thinking about this all season... You made it look easy so I'll be looking for a local supplier this weekend!
Quote Reply
Re: The ultimate DIY disc wheel cover how-to thread. [undertheradar] [ In reply to ]
Quote | Reply
Well done! Im surprised no one has tried to deepen their front wheel yet. It would be trickier but it could be done!.


Edit: nevermind, it wouldnt make sense to make a front wheel deeper because the spokes would be on the outside. Carry on.

who's smarter than you're? i'm!
Last edited by: veganerd: Sep 28, 11 15:06
Quote Reply
Re: The ultimate DIY disc wheel cover how-to thread. [undertheradar] [ In reply to ]
Quote | Reply
nice

Want: 58cm Cervelo Soloist. PM me if you have one to sell

Vintage Cervelo: A Resource
Quote Reply
Re: The ultimate DIY disc wheel cover how-to thread. [undertheradar] [ In reply to ]
Quote | Reply
Very impressive! I'll be watching for a report on the performance. I already have a Wheelbuilder cover, but I may have to talk some friends into trying this out just so I can take a stab at it ;-)
Quote Reply
Re: The ultimate DIY disc wheel cover how-to thread. [undertheradar] [ In reply to ]
Quote | Reply
Nice.

I started doing the exact same thing with some plastic signboard from a local sign shop. I got the NDS done and for some reason lost interest in completing it...but, now you've sort of got me thinking about finishing it up ;-)

http://bikeblather.blogspot.com/
Quote Reply
Re: The ultimate DIY disc wheel cover how-to thread. [wack70] [ In reply to ]
Quote | Reply
Wow, I was skeptical...especially since Wheelbuilder's covers are only $90...but you did a great job. How much do you think you spent, all in? (although clearly the satisfaction for you wasn't all financial, as a self-proclaimed tinkerer).
Quote Reply
Re: The ultimate DIY disc wheel cover how-to thread. [veganerd] [ In reply to ]
Quote | Reply
veganerd wrote:
Well done! Im surprised no one has tried to deepen their front wheel yet. It would be trickier but it could be done!.


Edit: nevermind, it wouldnt make sense to make a front wheel deeper because the spokes would be on the outside. Carry on.

Someone on here did:

http://forum.slowtwitch.com/...l%20fairing;#1858532

-------------------------------
´Get the most aero and light bike you can get. With the aero advantage you can be saving minutes and with the weight advantage you can be saving seconds. In a race against the clock both matter.´

BMANX
Quote Reply
Re: The ultimate DIY disc wheel cover how-to thread. [undertheradar] [ In reply to ]
Quote | Reply
Sweet! But the real question: does it make the bitchin' whoom, whoom, whoom sound?
Quote Reply
Re: The ultimate DIY disc wheel cover how-to thread. [undertheradar] [ In reply to ]
Quote | Reply
Nice job!


-------------------------------
I'm faster in Kilometers!
Wattie Ink Triathlon Team
Powered by Accelerate 3
Quote Reply
Re: The ultimate DIY disc wheel cover how-to thread. [undertheradar] [ In reply to ]
Quote | Reply
Very tidy job, indeed!

Coaching - Future Endurance
Quote Reply
Re: The ultimate DIY disc wheel cover how-to thread. [G$] [ In reply to ]
Quote | Reply
G$ wrote:
Wow, I was skeptical...especially since Wheelbuilder's covers are only $90...but you did a great job. How much do you think you spent, all in? (although clearly the satisfaction for you wasn't all financial, as a self-proclaimed tinkerer).

$30 and about an hour and a half of actual work.
Quote Reply
Re: The ultimate DIY disc wheel cover how-to thread. [undertheradar] [ In reply to ]
Quote | Reply
Nice job man, you should start your own business on the side making these!

"Heart Rate, Watts, I have no idea, I race, I don't pace." Andrew Starykowicz
Quote Reply
Re: The ultimate DIY disc wheel cover how-to thread. [Tyrell] [ In reply to ]
Quote | Reply
Tyrell wrote:
Awesome write-up! Too bad I just dropped coin for a Wheelbuilder cover a couple weeks ago. I look forward to DIY'ing my next set though! WOuld you say the .04 is about the right thickness? Looking back would you rather have thicker or thinner material?


I've done a version with 0.020" styrene sheet (the stuff for sale signs are made of). Not quite as durable, but lighter. For the seam I used matching electrical tape (white in my case).

I'm guessing that if I could use 20 mil styrene, 20 mil ABS would work too.

To the OP, great job! The final product looks really professional.

PS: You can use a modified version of this method to make a deep-V front.

ECMGN Therapy Silicon Valley:
Depression, Neurocognitive problems, Dementias (Testing and Evaluation), Trauma and PTSD, Traumatic Brain Injury (TBI)
Last edited by: Titanflexr: Sep 28, 11 17:08
Quote Reply
Re: The ultimate DIY disc wheel cover how-to thread. [Titanflexr] [ In reply to ]
Quote | Reply
Titanflexr wrote:
PS: You can use a modified version of this method to make a deep-V front.

I'd be very interested to see that! Got pics or a write up to share?
Quote Reply
Re: The ultimate DIY disc wheel cover how-to thread. [Tyrell] [ In reply to ]
Quote | Reply
Yeah...I could see it wouldn't be too difficult. Basically do the same thing, but you make a ring with whatever depth you want. Cut the radius as before to get the right dish. Once you have the two rings all set, you'd have to notch each one where the spokes will come through.
Quote Reply
Re: The ultimate DIY disc wheel cover how-to thread. [Tyrell] [ In reply to ]
Quote | Reply
I did it back in the mid-90's, so no pics. Undertheradar has the approach right. You cut the plastic rings and epoxy them to the rim. Then you cut slots that line up with the spokes (much easier with a radially laced wheel than one with crossed spokes), and terminate the slot where the spoke will go through with a round hole (I used a hole punch). You then pinch the two rings together and seal them (you can use epoxy, I used electrical tape). Leave a small area unsealed to stick the valve extender through. You can then seal the slots the spokes went through (again I used electrical tape, but epoxy would give a more finished look).
Since a small flat portion of the rings are glued parallel to the rim the design naturally forms a curved teardrop shape when you join the inside edges.

ECMGN Therapy Silicon Valley:
Depression, Neurocognitive problems, Dementias (Testing and Evaluation), Trauma and PTSD, Traumatic Brain Injury (TBI)
Quote Reply
Re: The ultimate DIY disc wheel cover how-to thread. [Titanflexr] [ In reply to ]
Quote | Reply
Great idea I just couldn't justify the amount of time you put into making those vs. buying from wheel builder.
Quote Reply
Re: The ultimate DIY disc wheel cover how-to thread. [Ironmanfan] [ In reply to ]
Quote | Reply
Ironmanfan wrote:
Great idea I just couldn't justify the amount of time you put into making those vs. buying from wheel builder.

You mean the whole hour and a half? :)
Quote Reply
Re: The ultimate DIY disc wheel cover how-to thread. [undertheradar] [ In reply to ]
Quote | Reply
really great work, and thank for the details, something to think about.

what rims are those?

thanks

Great things never come from comfort zones.
Quote Reply
Re: The ultimate DIY disc wheel cover how-to thread. [undertheradar] [ In reply to ]
Quote | Reply
Hey man. Great idea and it looks great.

This actually helped me resolve a current issue I was having. I have the notorious Speed Concept / Wheel cover rubbing issue.

You gave me the idea to slice my Wheel Cover just as you did from the center to the outside. When I laid it down, it laid down flatter. There was a small gap in the area I just sliced with a razor blade. I covered the gap up with electrical tap. Used electrical tape to hold the cover to the wheel and voila no more rubbing.

Looks like the opposite issue that you had with your flat piece. The Wheel builder cover appeared to have too much dish. Slicing it allowed it to flatten out. I'm quite happy right now.

So thanks!
Last edited by: elpete: Sep 29, 11 9:14
Quote Reply
Re: The ultimate DIY disc wheel cover how-to thread. [undertheradar] [ In reply to ]
Quote | Reply
Looks great
Quote Reply
Re: The ultimate DIY disc wheel cover how-to thread. [undertheradar] [ In reply to ]
Quote | Reply
Nice job, great pics. Confirmed to me that my time is worth the $90 to buy from WB.
Quote Reply
Re: The ultimate DIY disc wheel cover how-to thread. [undertheradar] [ In reply to ]
Quote | Reply
Great guide.

I did this once too, a long time ago.

A question: the taping of the disc (from the back) to some of the spokes as you pictured in one of your last steps, I assume you can't really do that to both sides of the disc cover. Or, if you can, how would that be done?

Advanced Aero TopTube Storage for Road, Gravel, & Tri...ZeroSlip & Direct-mount, made in the USA.
DarkSpeedWorks.com.....Reviews.....Insta.....Facebook

--
Quote Reply
Re: The ultimate DIY disc wheel cover how-to thread. [DarkSpeedWorks] [ In reply to ]
Quote | Reply
DarkSpeedWorks wrote:
A question: the taping of the disc (from the back) to some of the spokes as you pictured in one of your last steps, I assume you can't really do that to both sides of the disc cover. Or, if you can, how would that be done?

Nope, you can't. You only need to do it on the drive side, to pull the cover away from the cassette so you get less rubbing in your largest rear cog.

Asad
Quote Reply
Re: The ultimate DIY disc wheel cover how-to thread. [undertheradar] [ In reply to ]
Quote | Reply
Bravo..."Clap Clap Clap".

I'm so doing this!


Running is a gift.
Quote Reply
Re: The ultimate DIY disc wheel cover how-to thread. [undertheradar] [ In reply to ]
Quote | Reply
Why cut from the center of the disc to the edge only to turn around and cement it back together again? You seem to say that it won't lay flat otherwise but I don't understand how an uncut disc will not lay flat when a cut-and-then-recemented disc will.
Last edited by: JoeO: Sep 29, 11 15:29
Quote Reply
Re: The ultimate DIY disc wheel cover how-to thread. [JoeO] [ In reply to ]
Quote | Reply
JoeO wrote:
Why cut from the center of the disc to the edge only to turn around and cement it back together again? You seem to say that it won't lay flat otherwise but I don't understand how an uncut disc will not lay flat when a cut-and-then-recemented disc will.

The disc needs to be slight conical in order to extend from the hub to the rim as they are not in the same plane. The hub is way wider.

Hugh

Genetics load the gun, lifestyle pulls the trigger.
Quote Reply
Re: The ultimate DIY disc wheel cover how-to thread. [sciguy] [ In reply to ]
Quote | Reply
Yup....you have to form a slight cone, and the only way to do that is to make the slice.
You're not just making a slice though...you're removing a wedge of material.
Last edited by: undertheradar: Sep 29, 11 17:15
Quote Reply
Re: The ultimate DIY disc wheel cover how-to thread. [undertheradar] [ In reply to ]
Quote | Reply
Great write up.

I had to do it as I had a wheelbuilder cover that puckered and rubbed the non-drive chainstay and rubbed against the cassette on the drive side.

You took the care of the 2 biggest issues before you even started. Sourcing the material and cutting the circles. I could not find .040" ABS in Jacksonville, FL. I was told they could order it for me, but it would be about $18 for the sheet and $250 for shipping. So I went with .060" instead which they had in stock. That was $18 for a 4'x8' sheet. I then had to run the circles myself. It wasn't too hard but it certainly wasn't as clean your pieces.

One thing to keep in mind, the non-drive blank (before rolling) has to be slightly bigger than the drive side. It gets rolled into a higher cone. On my wheels, the final piece is about 5-8mm smaller in diameter than the drive side. If (when) I do it again, I'll cut the non-drive blank a little larger. I'll also do it in .040" or preferably .030".

Oh and I picked up the abs after work Monday, spent 1.5 on it that night. Here on Tuesday, I spent about 1 hours getting it finished and installed. Super easy.

Thanks again,

Scott
Quote Reply
Re: The ultimate DIY disc wheel cover how-to thread. [undertheradar] [ In reply to ]
Quote | Reply
How wide was the piece you removed on the drive side?
Quote Reply
Re: The ultimate DIY disc wheel cover how-to thread. [btmoney] [ In reply to ]
Quote | Reply
Tiny...maybe an 1/8th on the outer edge.
Quote Reply
Re: The ultimate DIY disc wheel cover how-to thread. [undertheradar] [ In reply to ]
Quote | Reply
How does wheelbuilder make their cone? I looked for a slice but didn't see one.
Quote Reply
Re: The ultimate DIY disc wheel cover how-to thread. [gardenvelo] [ In reply to ]
Quote | Reply
They probably heat/press/vacuum form it.
Quote Reply
Re: The ultimate DIY disc wheel cover how-to thread. [undertheradar] [ In reply to ]
Quote | Reply
Is this what you mean by hole saw?

http://api.ning.com/...grq/holesaw_Full.jpg


Running is a gift.
Quote Reply
Re: The ultimate DIY disc wheel cover how-to thread. [Jiowa] [ In reply to ]
Quote | Reply
After reading this...
Wheelbuilder can raise their prices and I'd still buy.
Quote Reply
Re: The ultimate DIY disc wheel cover how-to thread. [morey000] [ In reply to ]
Quote | Reply
By how much?


Running is a gift.
Quote Reply
Re: The ultimate DIY disc wheel cover how-to thread. [Jiowa] [ In reply to ]
Quote | Reply
Jiowa wrote:
Is this what you mean by hole saw?

http://api.ning.com/...grq/holesaw_Full.jpg
That's it.
Quote Reply
Re: The ultimate DIY disc wheel cover how-to thread. [morey000] [ In reply to ]
Quote | Reply
morey000 wrote:
After reading this...
Wheelbuilder can raise their prices and I'd still buy.

Lol, does it really look that difficult? I could have reduced it to just a few steps and most able bodied people could do it....the fine details are for the types that have a hard time with something simple like changing their own oil. ;)
Quote Reply
Re: The ultimate DIY disc wheel cover how-to thread. [undertheradar] [ In reply to ]
Quote | Reply
I searched and have noway of getting the material locally otherwise i'd be on it!!!
Thank you for sharing and demystifying the build up.
Quote Reply
Re: The ultimate DIY disc wheel cover how-to thread. [undertheradar] [ In reply to ]
Quote | Reply
As the owner I a pair of an covers, I can say yours are nicer- cleanly done!

Another option is to use heat shrink film- commonly used on model rc airplanes- its like heavy Saran wrap- you tack it on w a soldering iron and then when you hit it w a hair dryer it shrinks tight and wrinkle free- more fragile than what you made but light and less crafty

~~~~~~~~~~~~~~~
-Cartels: Serotta, Zipp 2001, Guru, eh?
-"It was kinda long and then i got really tired"
Quote Reply
Re: The ultimate DIY disc wheel cover how-to thread. [undertheradar] [ In reply to ]
Quote | Reply
Very well done. Thank you for sharing your How To...

_____________________
From now on...
Quote Reply
Re: The ultimate DIY disc wheel cover how-to thread. [VanNouAf] [ In reply to ]
Quote | Reply
hows it feel when riding?
Quote Reply
Re: The ultimate DIY disc wheel cover how-to thread. [undertheradar] [ In reply to ]
Quote | Reply
Did you use packing tape on both sides? How do you hold in place the side that you mount 2nd?


"Your limits are self imposed"
Quote Reply
Re: The ultimate DIY disc wheel cover how-to thread. [ironroo] [ In reply to ]
Quote | Reply
Black electrical tape around the outer edge on both sides holds it on. The packing tape on the inside keeps the cassette/derailleur from rubbing
Quote Reply
Re: The ultimate DIY disc wheel cover how-to thread. [spagoli] [ In reply to ]
Quote | Reply
spagoli wrote:
hows it feel when riding?

Great....very solid. No noise or anything.
Quote Reply
Re: The ultimate DIY disc wheel cover how-to thread. [morey000] [ In reply to ]
Quote | Reply
Well for for $30 in parts + 1.5 to 2 hours labor - i'm coming out WAY ahead by giving wheelbuilder 90 bucks.
Quote Reply
Re: The ultimate DIY disc wheel cover how-to thread. [undertheradar] [ In reply to ]
Quote | Reply
Very cool.

Great job!
Quote Reply
Re: The ultimate DIY disc wheel cover how-to thread. [sentania] [ In reply to ]
Quote | Reply
such an awesome mod and you saved a bunch of money too! Glad i stumbled across this thread.
Quote Reply
Re: The ultimate DIY disc wheel cover how-to thread. [jeff.ehret] [ In reply to ]
Quote | Reply
Yes, many folks on here make more than $40/hour so they write the process off, well like undertheradar, many of us like to tinker and find more joy in actually building something than we get out of working at the office.

Additionally, you can't find a wheelbuilder kit for all wheels- the flowcycling wheels for example.

Nice job partner and thanks for the detailed instructions.
Quote Reply
Re: The ultimate DIY disc wheel cover how-to thread. [bonafide505] [ In reply to ]
Quote | Reply
How did you settle on the diameter of your disc? Also on the drive side I assume you have to remove the cassette to take it off/put it on?
Quote Reply
Re: The ultimate DIY disc wheel cover how-to thread. [undertheradar] [ In reply to ]
Quote | Reply
That's pretty cool, but a wheelbuilder cover is already soooooooo cheap compared to all the other expenses of triathlon... it seems like a strange place to try to cut costs.
Quote Reply
Re: The ultimate DIY disc wheel cover how-to thread. [gttri15] [ In reply to ]
Quote | Reply
gttri15 wrote:
How did you settle on the diameter of your disc? Also on the drive side I assume you have to remove the cassette to take it off/put it on?

x2. I've been thinking about building one too and this finally gave me the push to actually do it.

I imagine if you don't bond the seam on the drive side and just tape it closed, you could install it without pulling the cassette.....or you could drill the center hole larger


sometimes you just have to eat the cake
Quote Reply
Re: The ultimate DIY disc wheel cover how-to thread. [undertheradar] [ In reply to ]
Quote | Reply
Very nice! I wonder if someone can weigh this version of the cover? Wheelbuilder covers vary from 320-420g depending on depth of rim.

FYI - I've been taping covers for 3 years now, as have several friends. As long as you don't stretch the tape (I use plain 3M electrical) and clean both surfaces with alcohol, never had a problem with the cover coming loose.

As for rubbing on the largest cog...either reduce the dish slightly when you make one, or trim the outer edge by 2-3mm (assuming you have a deep enough rim) to get it to sit closer to the spokes.

I did a mylar cover back in 2006 for masters track nats (they were still legal) and it worked great as well, that's semi-permanent though.
Quote Reply
Re: The ultimate DIY disc wheel cover how-to thread. [undertheradar] [ In reply to ]
Quote | Reply
Great post and excellent execution! Out here on the east coast I'm not finding any ABS suppliers, but have found a couple of on-line resources. Anyone care to comment on the suitability of either .030" hi impact styrene or .020" Lexan?
Quote Reply
Re: The ultimate DIY disc wheel cover how-to thread. [undertheradar] [ In reply to ]
Quote | Reply
Great job. Now I'm bummed that I dropped $$ with Wheelbuilder.
Quote Reply
Re: The ultimate DIY disc wheel cover how-to thread. [offline246] [ In reply to ]
Quote | Reply
offline246 wrote:
Great post and excellent execution! Out here on the east coast I'm not finding any ABS suppliers, but have found a couple of on-line resources. Anyone care to comment on the suitability of either .030" hi impact styrene or .020" Lexan?


I used .040 hi impact styrene and it worked beautifully. I'm sure the .030 would be fine as well.


---------------------------------------------------------------------------
Quote Reply
Post deleted by rhollinger [ In reply to ]
Re: The ultimate DIY disc wheel cover how-to thread. [matto] [ In reply to ]
Quote | Reply
matto wrote:
That's pretty cool, but a wheelbuilder cover is already soooooooo cheap compared to all the other expenses of triathlon... it seems like a strange place to try to cut costs.

As already mentioned, the Wheelbuilder covers don't fit that well on all wheels. The deeper the rim you're mating it too, the further off the fit gets. With this method, you get a totally custom fit regardless of the wheel.
Quote Reply
Re: The ultimate DIY disc wheel cover how-to thread. [undertheradar] [ In reply to ]
Quote | Reply
Just finished building a cover for my 60mm Chinese Carbon wheel. Total cost = $15. Time = 1.5 hour. Here's a couple of tips I discovered along the way.

  • Googled "plastics" in my city and found several suppliers. Cost for 1/2 sheet of ABS .030 was $13. They had several half sheets that had been stepped on and showed a small wrinkle. Was able to work around the wrinkle. Bought two half sheets for $10. Enough for two wheels.
  • Cutting your own circles is quite easy. Took a 1" x 1" hardwood stick about 20" long and screwed a drywall blade (razor blade) to the end, so that it protruded down just a bit. Measured up the stick 25.6mm and drilled a hole. Using the same drill bit, drilled a hole in the ABS and a hole in a backer board (a 24" square of 1/2-inch plywood). Took the drill bit, poked it through the hardwood stick, then the ABS sheet, so that it projected about 3/8-inch. Placed the protruding end into the back board. Now I had a pivot (the drill bit). Gently lowered the hardwood stick and razor blade onto the ABS sheet (kinda like a record player arm lowering onto a vinyl record). Rotated the ABS sheet while keeping light pressure on the razor blade. Cut a perfect circle after about 2 rotations.
  • Cut the circle from the center hole to the edge, to allow the ABS to "cone"
  • Only after cutting from the center to the edge did I cut the center hole. Using a hole saw (Harbor Freight had a set with 8-10 different sizes for $7).
  • Taped the ABS to the wheel using cheap electrical tape (you'll see why below). This establishes the "cone". Taped the overlap securely with masking tape.Removed the electrical tape and the cover.
  • Cut through both layers of the overlap. This gives you a great clean mating surface.
  • Glued per the OP instructions.
  • Clean you rim thoroughly, then wipe down with rubbing alcohol. Keep fingers off the taping surface.
  • Clean the ABS cover thoroughly, then wipe down the edge where you'll tape it with rubbing alcohol. Keep fingers off the taping surface.
  • Taping the finished cover to the wheel was the biggest learning moment. You can't use cheap electrical tape. And you can't stretch it at all, either. If you do, it just falls off by itself in about 10 minutes. Pretty disappointing. However, if you use Scotch (3M) Super 33+ electrical tape and don't stretch it, it sticks GREAT! But, it's about $5/roll so you'll want to use cheaper electrical tape when doing the original positioning (see above). Using one continuous piece, unroll the tape about 10", let it relax and pull itself back to original length, and gently lay it down. It will pull into a curve as you work around the edge.
I was worried about the tape pulling off, so I put the wheel and cover out in the sun for about 4 hours (100 degrees). Held rock solid and didn't disloge or peel of at all. Rode it for two days, same result. Raced IM 70.3 Kansas yesterday and it worked perfectly.
Quote Reply
Re: The ultimate DIY disc wheel cover how-to thread. [Kscycler] [ In reply to ]
Quote | Reply
Nice job man and great tips!
Quote Reply
Re: The ultimate DIY disc wheel cover how-to thread. [Kscycler] [ In reply to ]
Quote | Reply
I still have the stock shimano r500 wheels and the wheelbuilder covers wont work, I wonder if this would? How did you determine what diameter to cut each cover? If you are coned and still seated nicely at the rim, it must be more than the inner diameter of you wheel?

"It never gets easier, you just go faster."
-Greg LeMond

Quote Reply
Re: The ultimate DIY disc wheel cover how-to thread. [gluestick] [ In reply to ]
Quote | Reply
Yep, getting the cover to lay nicely is a bit of art and a bit of science. I have read on forum threads where the Wheelbuilder cover wouldn't lay down, then would, depending on the sequence of the fasteners. I don't really know, because I have only made my own.

As for the diameter, it's a bit of hit and miss. Plastic is cheap enough, so you can do some trial and error. You can't really measure from the inside of the rim to the center, because 1) the freewheel body is in the way on the drive side, and 2) the hub flange is in the way on the non-drive side. I made my best guess (for each side) and cut the disc a "tad" bigger (when I say bigger, I measured the drive side at 25.2cm on my wheel, so I cut it 25.5). That way, I could always cut it smaller (how, you ask? once the center hole has been cut, isn't it difficult to find the center again to pivot around? Well, yes. I put the circle that the hole cutter removed back in the disc, taped it as best I could to center it, and carefully cut the disc a bit smaller).

I think the key is taping the disc down to make sure you have the diameter correct and that it doesn't "cone" too much or too little. Keeping good written records while working is a must.
Quote Reply
Re: The ultimate DIY disc wheel cover how-to thread. [undertheradar] [ In reply to ]
Quote | Reply
i am also in socal would you consider making on for my bike and i would pay you?
Quote Reply
Re: The ultimate DIY disc wheel cover how-to thread. [undertheradar] [ In reply to ]
Quote | Reply
Very impressed!
Quote Reply
Re: The ultimate DIY disc wheel cover how-to thread. [undertheradar] [ In reply to ]
Quote | Reply
I just did this on my bike and it came out great!! Anyone wanna see some pics?
I went to the same plastics place located in Anaheim, Although the discs are now a whopping $20 a piece!
Quote Reply
Re: The ultimate DIY disc wheel cover how-to thread. [identity94] [ In reply to ]
Quote | Reply
paging Thomas Gerlach.......

you should post pics of your DIY disc wheel and crank cover on here. You might find yourself with a new side job selling to the ST folks! You're not too shabby on the bike either, so it's got real street cred ;-)
Quote Reply
Re: The ultimate DIY disc wheel cover how-to thread. [identity94] [ In reply to ]
Quote | Reply
could you make some and id buy them from you
Quote Reply
Re: The ultimate DIY disc wheel cover how-to thread. [dannyc10] [ In reply to ]
Quote | Reply
I just bought a black 4' x 8' sheet of .030 Polystyrene and cut it into (4) 2' x 4' sections. I only need (1) to make a wheel disc. Anyone interested in the (3) sections left to build a disc themselves in the Tampa Bay, FL area let me know, thanks.
Quote Reply
Re: The ultimate DIY disc wheel cover how-to thread. [jackmott] [ In reply to ]
Quote | Reply
nice work!
If you need any graphics contact me
Quote Reply
Re: The ultimate DIY disc wheel cover how-to thread. [checkoayala] [ In reply to ]
Quote | Reply
Really nicely done

Formely stef32
Quote Reply
Re: The ultimate DIY disc wheel cover how-to thread. [stef32] [ In reply to ]
Quote | Reply
If anyone is interested in designing and building a aero carbon rim I'm in the beginning stages of design portion. I could start up a blog with updates over winter break.
Last edited by: Cajer: Dec 3, 12 18:34
Quote Reply
Re: The ultimate DIY disc wheel cover how-to thread. [undertheradar] [ In reply to ]
Quote | Reply
Need graphics for your covers?
Im in Orange county, Cypress area and have a printer 54" wide Eco-Solvent inks, full color, if interested please reply back!

Thanks,
Checko Ayala
Quote Reply
Re: The ultimate DIY disc wheel cover how-to thread. [undertheradar] [ In reply to ]
Quote | Reply
Hey there friend!!!! I'm located in SoCal to and I'm trying to do this to my bike as well! But I have a few questions, can you help me? :)
Quote Reply
Re: The ultimate DIY disc wheel cover how-to thread. [undertheradar] [ In reply to ]
Quote | Reply
Thanks for this great tutorial. I finally got around to making mine yesterday. The hardest part was cutting the discs as my abs came in a single sheet.

I made 3 loops on the back of each disc using spare abs, about 3" long and 1/2" wide. I glued these down with a chopstick slid thru the middle of each one to provide some clearance. Once I put both covers on, I ran a zip tie thru the straps which pulls both covers together. Worked pretty well.

the only thing that will make me faster now is some flames painted on the cover.
Quote Reply
Re: The ultimate DIY disc wheel cover how-to thread. [Ellsworth81] [ In reply to ]
Quote | Reply
anyone have a picture of a cover made with Hi-Impact Styrene? would 0.02'' or 0.03'' be recommended?
Quote Reply
Re: The ultimate DIY disc wheel cover how-to thread. [undertheradar] [ In reply to ]
Quote | Reply
I just made some disc covers for my wheels. The plastic I found was .045 thick. I got them made and installed and noticed they wheels seemed pretty heavy. So I weighed the wheels and the wheel, cassette, and cover weighed in at 6 lbs. I thought that was a lot. I weighed just one cover and it weighs 14- 15 oz. So that means I'm adding 2 lbs to the rear wheel and to the total bike weight. I was curious if there was a point that the weight out weighs the aerodynamics of the cover. I rode the bike this morning and I couldn't tell any difference but it was just one ride. Anybody have any suggestions...I guess I just need a stronger engine for the bike.
Quote Reply
Re: The ultimate DIY disc wheel cover how-to thread. [cruiserguy73] [ In reply to ]
Quote | Reply
The weight won't slow you down unless you are climbing... and then not a lot.
Quote Reply
Re: The ultimate DIY disc wheel cover how-to thread. [rruff] [ In reply to ]
Quote | Reply
I tried this out with cardboard and package tape, worked fine on the none drive side. On the ds I had either not a smooth surface from taping to the spokes or chain and rd contact when on the highest cog.
Did anyone try to warm up the plastic to avoid the cutting and cementing process?
And yes....the weight is another thing I'm focused on cause of kinda hilly courses I have around for training and even racing.

-shoki
Quote Reply
Re: The ultimate DIY disc wheel cover how-to thread. [shoki] [ In reply to ]
Quote | Reply
I did some investigating of this lately. Looks like you can get black high impact styrene in thinner sheets like .02" but I'm not sure how thin you can go and still have it work well. The ABS I'm using is .04".

I think you'd have a really tough time getting a smooth surface by heating the plastic... but who knows. The trick is to make the cone just right so you don't have to distort it to make it fit flush.
Quote Reply
Re: The ultimate DIY disc wheel cover how-to thread. [rruff] [ In reply to ]
Quote | Reply
That I know. I was just thinking to avoid anything payed in there extra (like the stripe for glueing) because of the wheel maybe not true anymore, but maybe I'm throwing the ball too far.

-shoki
Quote Reply
Re: The ultimate DIY disc wheel cover how-to thread. [rruff] [ In reply to ]
Quote | Reply
I'm using .03 ABS plastic on the wheel covers that I make. To be honest, and I know a lot of people may disagree but in my
opinion the "overlap" caused is not noticeable at all. Yes it is more noticeable in the .04 but in the .03 it really isn't. I can't believe
that the wind could tell the difference.... Cutting out the overlap is not a big deal either but not really needed.

I have not tried .02 plastic of any kind but I have to think it'd be a bit too flimsy. I think the .03 that I use is the best for a
DIY disc wheel cover.

As far as using high impact polystyrene I've tried it but it's not really good for a long term application. It's good to use for prototypes and
I do, but not for a disc cover that will last for several years. Maybe getting it wrapped would be cool and that would help
make it a bit more hardy but that would be a bit spendy unless you could do that yourself.

Find out what it is in life that you don't do well, then don't
do that thing.
Quote Reply
Re: The ultimate DIY disc wheel cover how-to thread. [elpete] [ In reply to ]
Quote | Reply
did I miss how this cover was attached to the wheel besides the shipping tape? If the disc isnt secure that could turn into a pretty hairy situation.
Quote Reply
Re: The ultimate DIY disc wheel cover how-to thread. [Theo911] [ In reply to ]
Quote | Reply
They run high quality 3M electrical tape round the cover/rim join.

-------------------------------
´Get the most aero and light bike you can get. With the aero advantage you can be saving minutes and with the weight advantage you can be saving seconds. In a race against the clock both matter.´

BMANX
Quote Reply
Re: The ultimate DIY disc wheel cover how-to thread. [Theo911] [ In reply to ]
Quote | Reply
Theo911 wrote:
did I miss how this cover was attached to the wheel besides the shipping tape? If the disc isnt secure that could turn into a pretty hairy situation.


the easy way to do that is to duct tape the cover to the spokes on one side and use double sided duct tape around the hub
area on the other side. I've done that for a long time and I've never had a problem.

edit: and of course you use 3M Super 88 electrical tape around the perimeter of the disc.

Find out what it is in life that you don't do well, then don't
do that thing.
Last edited by: pattersonpaul: Oct 30, 13 14:01
Quote Reply
Re: The ultimate DIY disc wheel cover how-to thread. [pattersonpaul] [ In reply to ]
Quote | Reply
Sounds like you know something about plastic. Why is high impact styrene no good? Is ABS better than nylon?

I'm not even seeing large sheets of .030 ABS online anywhere. Do you remember where you got it? I bought from Tap Plastics before, but the thinnest they list now is .060.
Quote Reply
Re: The ultimate DIY disc wheel cover how-to thread. [rruff] [ In reply to ]
Quote | Reply
Polystyrene plastic is used to make cheap temporary signs mainly for indoors and also for prototype projects, that's what I'm told.

ABS plastic is bit more sturdy and won't break down with sunlight nearly as quickly as polystyrene.

I really don't know much about plastic other than for making disc wheel covers. I will be happy to send you
some ABS plastic in the .03 thickness, enough for you to experiment with to make a disc wheel.

Tap Plastics and most other plastic mfg companies don't carry .03 much. I guess there's not that much
of a call for it.

Find out what it is in life that you don't do well, then don't
do that thing.
Quote Reply
Re: The ultimate DIY disc wheel cover how-to thread. [Theo911] [ In reply to ]
Quote | Reply
I experimented on my own disc cover using abs plastic.

I made a hole on the drive side just the size of the biggest cog so cover removal doesn't need cog removal.
Then I made a round sticker sheet to cover the hole drive side.

I didn't like the screws and the waves that come out sometimes.
To eliminate the screws, I made the non drive side have small grommets to zip tie on the spokes.
Then I install the drive side with small holes around the sprocket hole to zip tie drive side.
Then I use McCall matte decals to fix around the rims. Using a little hair dryer makes the bond better.

Removal needs some work, sticker replacement & zipp tie cutting.
But I like the clean look when in place, no screws, no waves.


Came out with a cleaner look.
I can remove with cog in place, replace the stickers & zip tie.
Added about 130g to my 808FC.
Much cheaper than buying a whole new Super 9.
Still no wok wok wok sound of a real disc.

Last edited by: campled: Nov 5, 13 1:48
Quote Reply
Re: The ultimate DIY disc wheel cover how-to thread. [campled] [ In reply to ]
Quote | Reply
Looks nice. Not seeing any seam at all... it does have a seam? What thickness of ABS is it?
Quote Reply
Re: The ultimate DIY disc wheel cover how-to thread. [rruff] [ In reply to ]
Quote | Reply
Its a .3 thick abs.
Painted matte over it, you can see it slightly at about 2:00 of the non drive side pic.
Quote Reply
Re: The ultimate DIY disc wheel cover how-to thread. [campled] [ In reply to ]
Quote | Reply
that looks really good -- I like the zip tie attachment.

campled wrote:
I made a whole on the drive side just the size of the biggest cog so cover removal doesn't need cog removal.
Then I made a round sticker sheet to cover the hole drive side.

Sure you can remove it without removing the cogs, but if you want to put a new sticker on when you re-install it you need to take off the cassette.
Quote Reply
Re: The ultimate DIY disc wheel cover how-to thread. [asad137] [ In reply to ]
Quote | Reply
The cog hole sticker has a line cut.
I can maneuver the sticker around the cog & press in place with a popsicle stick.
A bit of a hassle but the best I could think of for now.
Quote Reply
Re: The ultimate DIY disc wheel cover how-to thread. [campled] [ In reply to ]
Quote | Reply
Very nice, Wheel Builders should hire you. In my experience the only way you can get the "real disc" sound is to have the disc
wheel covers bonded to the spokes. And by bonded I mean pretty much 100%.

I've used foam insulation spray to do that and it works pretty well. Obviously not something that you'd want to do with an expensive
rear wheel like you have there. Try it with a cheap training wheel and some DIY ABS covers.

The only thing about doing that is when the disc covers are melded together with the wheel on a sunny and hot day the black covers will
warp caused by heat deflection. You can paint them silver, grey or white and it won't do that too badly.

Very smart solution you have there.

Find out what it is in life that you don't do well, then don't
do that thing.
Last edited by: pattersonpaul: Nov 5, 13 7:06
Quote Reply
Re: The ultimate DIY disc wheel cover how-to thread. [campled] [ In reply to ]
Quote | Reply
Very clean. I like the grommet idea. Thumbs up.

-shoki
Quote Reply
Re: The ultimate DIY disc wheel cover how-to thread. [shoki] [ In reply to ]
Quote | Reply
that looks great--are the grommets glued to the abs? can you explain more in detail how the cover is attached to the wheel at the edges? electrical tape?
Quote Reply
Re: The ultimate DIY disc wheel cover how-to thread. [Theo911] [ In reply to ]
Quote | Reply
Non drive side
- one hole cut, cone shaped.
- grommets glued to inside near hub at 5 points.
- grommets attached to wheel zip tied to spoke

Drive side
- two hole cut, inflation & cog hole.
- almost flat shape
- cog hole almost same size as biggest cog.
- 5 small holes made near cog hole for zip ties.
- After zip tie attached & cut, sticker installed to cover cog hole.

Start with non drive side.
After both are zip tied, I cut a 2cm wide strip from a sheet of matte tape (McCal brand).
I tape the ends to the rim, forcing the circular path from the straight matte tape.
I blow dry the tape to make it conform to the rim & have better adhesion.

Will try it this weekend, passing over rough sections to see how well it stays together.
Quote Reply
Re: The ultimate DIY disc wheel cover how-to thread. [campled] [ In reply to ]
Quote | Reply
campled wrote:
Its a .3 thick abs.
Painted matte over it, you can see it slightly at about 2:00 of the non drive side pic.

Perhaps you meant 0.030"? 0.3 is nearly 3/8".
Quote Reply
Re: The ultimate DIY disc wheel cover how-to thread. [wasfast] [ In reply to ]
Quote | Reply
wasfast wrote:
campled wrote:
Its a .3 thick abs.
Painted matte over it, you can see it slightly at about 2:00 of the non drive side pic.


Perhaps you meant 0.030"? 0.3 is nearly 3/8".


Yes if it's as light as he said it was it would have to be 0.030. Also
not to nick pick I'm wondering if the weight was for one disc wheel cover
and not both added together.

Find out what it is in life that you don't do well, then don't
do that thing.
Last edited by: pattersonpaul: Nov 5, 13 13:04
Quote Reply
Re: The ultimate DIY disc wheel cover how-to thread. [pattersonpaul] [ In reply to ]
Quote | Reply
pattersonpaul is correct on both. thickness is .03 and weight i wrote is for one side.weight for both covers came out 302grms.
Quote Reply
Re: The ultimate DIY disc wheel cover how-to thread. [ In reply to ]
Quote | Reply
Here's my Mad Fiber Disc Wheel...


Quote Reply
Re: The ultimate DIY disc wheel cover how-to thread. [JTK28] [ In reply to ]
Quote | Reply
Gotta give some props, that is clean good looking work. Can you explain the process?
Quote Reply
Re: The ultimate DIY disc wheel cover how-to thread. [Pantelones] [ In reply to ]
Quote | Reply
Pantelones wrote:
Gotta give some props, that is clean good looking work. Can you explain the process?


If you're asking ME how i turned my mad fiber into a disc wheel...

It was actually pretty easy after some trial and error.

Basically i went to the dollar store and bought some foam board sheets to create the disc shape. Then just covered the wheel with "carbon fiber" vinyl (the stuff they cover cars with).

If you want a more detailed explanation i'll try to write up a tutorial.

I also have to mention these are the 2.0 version. My method won't work for the original style spoke pattern.
Last edited by: JTK28: Jan 25, 14 22:01
Quote Reply
Re: The ultimate DIY disc wheel cover how-to thread. [JTK28] [ In reply to ]
Quote | Reply
Here's what I did:

The material is called curv, I dicided to go with .6mm sheet.
Both covers weight 358 grams.
This non drive side will be attached with 3m 33+ from the inside and all the way around.
The drive side below will be attached as above but with Velcro which is attached to the spokes instead of the tape.


I wasn't sure about saving weight and just goin til the rim starts but think the tape last longer on the flat part of the rim.
Didn't drive it cause of the temp we got but can't wait to get the thing running. It will be attached to an 404 zipp zedtech set which used to run for Saxo bank.

-shoki
Last edited by: shoki: Jan 26, 14 4:02
Quote Reply
Re: The ultimate DIY disc wheel cover how-to thread. [shoki] [ In reply to ]
Quote | Reply
Where did you purchase the curv product? I went to their site and its not very user friendly. This seems like a good winter project.
Quote Reply
Re: The ultimate DIY disc wheel cover how-to thread. [ten26] [ In reply to ]
Quote | Reply
ten26 wrote:
Where did you purchase the curv product? I went to their site and its not very user friendly. This seems like a good winter project.
http://www.modulor.de/...s/cnid/AAK/anid/AAKI

It's in Germany, just to make sure. In the US I would have bought the wheelbuilder cover.

One change I had to do.....the cover needed to cut down so it just ends with the spokes and is taped to the rim. I had rubbing from the RD with that angle. It gets lighter with this, almost 2" less than pictured. Gotta upload a final one soon.

-shoki
Quote Reply
Re: The ultimate DIY disc wheel cover how-to thread. [shoki] [ In reply to ]
Quote | Reply
These all look great. I'm just about to have a go but was considering using 2mm Correx (corrugated plastic sheet). By my calculations, the plastic for both sides of the covers should come in around 150g which seems pretty light. I still think it should be rigid enough due to the corrugations. Anyone ever considered or had a go using this stuff or something similar?

Thanks!
Quote Reply
Re: The ultimate DIY disc wheel cover how-to thread. [PBDav] [ In reply to ]
Quote | Reply
I used a .028" Kydex sheet plastic for mine. It shaped together beautifully and stuck perfectly to the rim. I never weighed it but I certainly would have liked to go lighter.

The Correx seems like a possible light option, I'm just curious if it will lenticular-ly (not a real word) curve well to shape around the rim.

Alex Arman

Strava
Quote Reply
Re: The ultimate DIY disc wheel cover how-to thread. [doublea334] [ In reply to ]
Quote | Reply
I work your Kydex sheet to be about 950 grams/m^2 vs 270 for the Correx so it could be <1/3 the weight. If it works....
Quote Reply
Re: The ultimate DIY disc wheel cover how-to thread. [PBDav] [ In reply to ]
Quote | Reply
Keep in mind that you need enough clearance as well as kinda strong material. I went with 0.6mm and there is just a little clearence for the cassette and the RD, depends on the wheel also.

-shoki
Quote Reply
Re: The ultimate DIY disc wheel cover how-to thread. [shoki] [ In reply to ]
Quote | Reply
I made a trispoke disc using 3 materials

  1. a pack of elmer's foam multiboard which was cut into the triangle sections
  2. held in place by electrical tape (same method catalyst uses to secure their carbon wheel covers
  3. some automotive carbon fiber vinyl sheet roll (http://www.amazon.com/...00?ie=UTF8&psc=1).


I did a bunch of testing on a 2 mile out and back with a 28 spoke wheel, my trispoke, trispoke converted to disc, and a hed jet disc.

Results were:
28 spoke wheel - 21.08 mph
trispoke wheel - 21.40 mph
trispoke disc - 21.77 mph
hed jet disc - 21.92 mph

Picture at:
http://www.beginnertriathlete.com/discussion/forums/thread-view.asp?tid=528407&mid=5094616#M5094616


Last edited by: navybeaver: Feb 19, 15 14:38
Quote Reply
Re: The ultimate DIY disc wheel cover how-to thread. [navybeaver] [ In reply to ]
Quote | Reply
navybeaver,
Your wheel looks awesome!!

"It doesn't get any easier, you just get faster" - Greg LeMond
Quote Reply
Re: The ultimate DIY disc wheel cover how-to thread. [undertheradar] [ In reply to ]
Quote | Reply
Made mine today.

Pretty much followed the OPs advice. The one tip I'd add is when you tape the cover to establish the dish ---- make a mental note of the amount of overlap on the cover. Then when you remove from wheel to glue together ---- make sure your overlap is still there. One my first try, the tape didnt hold the overlap and the dishing was off for the non drive side (luckily, the dishing was good enough for the drive side ---- Winning!)

Cut my own circles ----- piece of wood with a screw in it to pivot on ----- hole drilled in end for fine tip sharpie pen:


Want: 58cm Cervelo Soloist. PM me if you have one to sell

Vintage Cervelo: A Resource
Quote Reply
Re: The ultimate DIY disc wheel cover how-to thread. [doublea334] [ In reply to ]
Quote | Reply
doublea334 wrote:
I used a .028" Kydex sheet plastic for mine. It shaped together beautifully and stuck perfectly to the rim. I never weighed it but I certainly would have liked to go lighter.

The Correx seems like a possible light option, I'm just curious if it will lenticular-ly (not a real word) curve well to shape around the rim.
doublea334, what did you use to plastic weld the Kydex seams? I found it pretty cheap online but not sure which item to use for welding it.

Found 0.040 ABS too, maybe I should just stay with that route since I have the ABS cement already from the last time I made a cover for my old wheels .

<We all know that light travels faster than sound. That's why certain people appear bright until you hear them speak>
Quote Reply
Re: The ultimate DIY disc wheel cover how-to thread. [dmacandcheese] [ In reply to ]
Quote | Reply
dmacandcheese wrote:
doublea334 wrote:
I used a .028" Kydex sheet plastic for mine. It shaped together beautifully and stuck perfectly to the rim. I never weighed it but I certainly would have liked to go lighter.

The Correx seems like a possible light option, I'm just curious if it will lenticular-ly (not a real word) curve well to shape around the rim.
doublea334, what did you use to plastic weld the Kydex seams? I found it pretty cheap online but not sure which item to use for welding it.

Found 0.040 ABS too, maybe I should just stay with that route since I have the ABS cement already from the last time I made a cover for my old wheels .

I used 'ABS to PVC transition cement'. It was what a Home Depot employee recommended. Seemed to hold up well for the season of racing I put in on the wheel.

Alex Arman

Strava
Quote Reply
Re: The ultimate DIY disc wheel cover how-to thread. [undertheradar] [ In reply to ]
Quote | Reply
are you riding 700c rims?
Quote Reply
Re: The ultimate DIY disc wheel cover how-to thread. [undertheradar] [ In reply to ]
Quote | Reply
Can anyone give any input as to if .030 HIPS is thick enough for this? I found a 24" x 48" sheet on Amazon for about $15 shipped.
Quote Reply
Re: The ultimate DIY disc wheel cover how-to thread. [beercity] [ In reply to ]
Quote | Reply
Considering that people used to run Monocote or Mylar covered wheels as disks, I would think so. The issue would be durability. I wouldn't use it (or any disk) as an everyday wheel. A little packing tape can fix some transition area boo-boos. If nothing else, the lighter material will make cutting easier.
Quote Reply
Re: The ultimate DIY disc wheel cover how-to thread. [beercity] [ In reply to ]
Quote | Reply
I used .030 Polystyrene and it worked great. The only issue was trying to keep the the cut from making a "peak" instead of staying smooth. I made the strip on the backside fairly narrow so that didn't help. Just a cosmetic issue and really not noticeable. Plenty strong.
Quote Reply
Re: The ultimate DIY disc wheel cover how-to thread. [smon] [ In reply to ]
Quote | Reply
on a very hot sunny day black polystyrene might deflect or warp a bit if you use double sided
tape to connect the inside of the discs to the spokes.

That has been my experience a few years ago when I tried using HIPS. Also it may tear
a bit easier than ABS plastic. This might be an issue around the inflation cutout.

Find out what it is in life that you don't do well, then don't
do that thing.
Quote Reply
Re: The ultimate DIY disc wheel cover how-to thread. [pattersonpaul] [ In reply to ]
Quote | Reply
I was initially worried about that too. But had it in 90* heat without a problem.

I used packing tap on the drive side to connect to the spokes along with a round sticker behind the cassette. Then on the non-drive side, I made a twist lock connection so it is attached the the spokes. So the covers would need to come come un-taped and also twist to come off or have any flex. Helps that I have it on a 90mm wheel, so it won't have as much flex as a trainer wheel.
Quote Reply
Re: The ultimate DIY disc wheel cover how-to thread. [undertheradar] [ In reply to ]
Quote | Reply
One more question, has anyone had luck getting DIY covers to fit on the wheels on Wheelbuilder's incompatible wheels list? I have a Fulcrum Racing wheel that I might like to try making a cover for.
Quote Reply
Re: The ultimate DIY disc wheel cover how-to thread. [undertheradar] [ In reply to ]
Quote | Reply
This thread inspired me, so here is a short writeup of how I built my first disc wheel. The wheel is built with BHS SL210 hub, Sapim Lasers and a BHS c22w rim laced 16:8. Molds were cnc milled from Sikablock M700, sealed first with epoxy, then mold sealant and finally treated with release agent. The layup is (from the outside) one layer 160g/m2 spread tow fabric, 1.2mm airex with a particular cut pattern (see photo) and again a layer of 160g/m2 spread tow with four cutouts (about 15mm offset relative to the cutout in the foam so the inner fabric layer meets the outer). The covers were then glued to the rims with UHU Poly Max. There is almost no gap ( 0 to 0.5mm) between cover and brake track. Weight of the finished wheel is 1112g.
The wheel works fine but still has potential for improvement. Maybe avoid the four cutouts in the central part of foam and inner layer, in the section where there is only a single layer of fabric a carbon tow with superglue (on the inside) had to be added to avoid any flopping.


Quote Reply
Re: The ultimate DIY disc wheel cover how-to thread. [SLOTOPO] [ In reply to ]
Quote | Reply
nope
Quote Reply
Re: The ultimate DIY disc wheel cover how-to thread. [undertheradar] [ In reply to ]
Quote | Reply
Although this is a very old post, thanks for the lead. I just switched to an ICE VTX racing trike, and the only good option for a 20" wheel cover is Streamline, in the UK, for $500. Industrial Plastic Supply is only 30 miles from my home. This should be a fun project.
Quote Reply
Re: The ultimate DIY disc wheel cover how-to thread. [Denny Crane] [ In reply to ]
Quote | Reply
Wanted to res this thread to see if anyone has done anything new with this idea/concept.
In Reply To:
Quote Reply
Re: The ultimate DIY disc wheel cover how-to thread. [No Grit] [ In reply to ]
Quote | Reply
I'm looking at doing this but am curious how well it will work with disc brakes. Wheel builder says the brake calipers will rub on the cover and aren't compatible where as ez gains says they have them available. But at 1/10th the cost of the ez gains solution it seems worth it to DIY. Especially given I have quite a few plastic manufacturers with 15-20 minute drive of me.
Quote Reply
Re: The ultimate DIY disc wheel cover how-to thread. [habbywall] [ In reply to ]
Quote | Reply
I did my own homemade disc cover with my Cervelo P-series on vision team 30 wheels. Had no issues with disc brake clearance.
Quote Reply