Login required to started new threads

Login required to post replies

Prev Next
Re: The official Cervelo P5 thread [damon_rinard] [ In reply to ]
Quote | Reply
Hi Damon/everyone else

What length bolt are people using for the BTA bottle cage mount as as a "normal" bolt hits the stem cover in the low aduro setup?

Would an 8mm long bolt work?

Cheers
Quote Reply
Re: The official Cervelo P5 thread [campled] [ In reply to ]
Quote | Reply
I use chain lube to clean the matte white. It works really well. Yeah, just tri-flow or whatever 'normal' chain lube I have sitting around the house. I use a clean rag and it gets the white nice and clean.

For the BTA bottle (as someone asked) I don't know what size screw I'm using. Just get one that's shorter! :)


Brandon Marsh - Website | @BrandonMarshTX | RokaSports | 1stEndurance | ATC Bikeshop |
Quote Reply
Re: The official Cervelo P5 thread [hobie1] [ In reply to ]
Quote | Reply
Hobie,

You can reach out to our Tech Specialist and Service guys here: cervelo.com/en/contact.html

You can also find a basic walk through on the bar assembly on the P5 Manual here: P5 Manual It is still a good idea to get in touch with the service guys if you have a specific torque question. But, this should get you started on putting it all together.


David Byer
Cervélo
Quote Reply
Re: The official Cervelo P5 thread [-BrandonMarshTX] [ In reply to ]
Quote | Reply
Hey Brandon..for the BTA bottle - do you need to place a washer on the bar to level out the bottle - or do you ride with it at an angle?

Cheers!

JR

PS - Still trying to figure out that Garmin/Torhan's solution.... ;-)

_____________________________________________
"It's a line you have to cross to understand."
Quote Reply
Re: The official Cervelo P5 thread [hobie1] [ In reply to ]
Quote | Reply
Hi hobie1,

Thanks for your patience. I see David Byer just posted how to get in touch with CS; they should be able to supply the 3T diagram for the High-V when they're back in the office next week.

In the meantime, I can remember a few:

Among all the M5 flat head bolts, the most critical bolts are the four that attach the High-V to the stem. Use the 20 mm bolts in the back and 25 mm bolts in the front. Grease the threads and torque them all to 3 N*m.

The other M5 flat head bolts attach the arm pad supports. They're 12mm long. Grease and torque these to 3 N*m.

Have fun,

Damon Rinard
Engineering Manager,
CSG Road Engineering Department
Cannondale & GT Bicycles
(ex-Cervelo, ex-Trek, ex-Velomax, ex-Kestrel)
Last edited by: damon_rinard: Jun 17, 14 13:04
Quote Reply
Re: The official Cervelo P5 thread [campled] [ In reply to ]
Quote | Reply
I use ArmorAll Cleaning Wipes to keep my P5-6 clean: http://www.armorall.com/...uct.php?product_id=1

Bought it at my local Wal-Mart.

Works pretty good.
Quote Reply
Re: The official Cervelo P5 thread [jar70] [ In reply to ]
Quote | Reply
Ours seems pretty level as is. At least not too noticeable that it isn't.


Brandon Marsh - Website | @BrandonMarshTX | RokaSports | 1stEndurance | ATC Bikeshop |
Quote Reply
Re: The official Cervelo P5 thread [damon_rinard] [ In reply to ]
Quote | Reply
Hi Damon and everyone else,

I finally received my P5 the other day, and I REALLY like it!

However, today I was going to change from competition wheels to training wheels, and thus change brake pads (carbon to alu rim). This was not easy on the rear brake. Maybe I am doing it wrong?

Since the small bolt that holds the pad in place is placed in the back of the brake shoe and thus blocked by the frame, I had to remove the holder to switch pads. It's definitely easier than on the P4, but I would like to skip this step totally if possible. I tried to remove the brake to get a better angle of the hex key on the drive side but ended up bleeding the brake (oups - should have read the manual!).

Are there some better way to do this? Are there any brake shoes that have the small fastening bolt on the front side, or is it safe do go without them (I guess it is if you never spin the wheel backwards with engaged brakes)?

I also wonder how I will do this after I have put my 53 tooth Quarq on next week, since the wider diameter of the chainring will probably not allow the hex key to reach the brake shoe bolt. Maybe removing the brake is the way to go after all?

Also ended up with a hole between the brake covers on the front brake, but I think this has been discussed a couple of times in the thread - washers between the brake shoe and brake arm, right? (Which means I will have to remove the brake shoe anyway when switching wheels - so I think I will just live with it.)

Now out for a ride...
Last edited by: tripirate: May 25, 13 14:03
Quote Reply
Re: The official Cervelo P5 thread [damon_rinard] [ In reply to ]
Quote | Reply
Thank you for the quick reply Damon!

Putting it together slowly. I want to make sure everything is perfect. Thank you for the torque settings and bolt sizes for the Aduro.

I have another concern. Please see the image below.

Can you help me where the bolts labelled A, B and C go? I already put the anti-rotation bolt on the top most of Aduro bar (facing down). There are still 2 holes which align perfectly to the Spacer and also to the thin spacer where the beard mount is attached. I want to make sure I have everything covered.

Thank you,


Last edited by: hobie1: May 26, 13 3:34
Quote Reply
Re: The official Cervelo P5 thread [damon_rinard] [ In reply to ]
Quote | Reply
I have also just discovered a problem with the bleed screw on the top of the lever. For me the hole with the Torx cut out has stripped and is now just a circle. As Damon says it is just a plastic screw. Not very robust. Is it possible to get spares in UK.
Quote Reply
Re: The official Cervelo P5 thread [hobie1] [ In reply to ]
Quote | Reply
Hi hobie1,

Great photo, makes helping you easy, thanks!

"What screws go here?" is where you attach the fairing mount for the beard -- if you are attaching the beard there. Otherwise, leave them empty (as you've done), and the fairing mount attaches to the bottom spacer, exactly as you figured out.

Screws you've labelled A B and C -- Four of them attach the plastic covers that go on the base bar. They cover the holes where the Low bar would attach; with the High-V, these holes are empty until the plastic covers hide them. Each plastic cover takes one 8 mm bolt in the rear hole and one 16 mm bolt in the front hole.

Sitting here at home, I don't recognize right now what the three other screws might be for. They might hold the Di2 battery shelf in the hidden pocket in the rear wheel cutout in the seat tube?

Hopefully I've been able to give you enough info to make progress this weekend, and our customer service techs can help more tomorrow or Tuesday.

Have fun,

Damon Rinard
Engineering Manager,
CSG Road Engineering Department
Cannondale & GT Bicycles
(ex-Cervelo, ex-Trek, ex-Velomax, ex-Kestrel)
Quote Reply
Re: The official Cervelo P5 thread [ In reply to ]
Quote | Reply
Hi guys,

I just got my P5 six and im looking to mount my bottle BTA. How many bolt holes should there be to mount the cage?
I only have one and the bottle cage moves alot, so this doesnt seem right. Am i missing something?
Perhaps someone could post a picture of what i should have?

Cheers, Lemboss
Quote Reply
Re: The official Cervelo P5 thread [Lemboss] [ In reply to ]
Quote | Reply
you should have the big flat piece that mounts under teh armrests and has one hole in it. the other hole is either on the low or hi V
Quote Reply
Re: The official Cervelo P5 thread [damon_rinard] [ In reply to ]
Quote | Reply
 
Hi Damon,

Is there a grommet for the hole where the front derailleur cable goes into the frame? Also there is a slack in the cable. Any ideas how to make it stick to the frame?


Thank you,


Quote Reply
Re: The official Cervelo P5 thread [hobie1] [ In reply to ]
Quote | Reply
Hi hobie1,

Because a grommet would direct the cable toward the crank, we do not recommend one there. Instead, to keep the wire close to the frame, give it a twist (try both directions), then plug it in. In addition, it's a good idea to cover it with a bit of tape, either Shimano cable cover tape or clear glossy Scotch tape. As with all adhesives, surface prep is key: wipe your fingers and the frame with alcohol to remove oils before sticking the tape on.

Your P5 looks like it's going together well. Exciting times!

Cheers,

Damon Rinard
Engineering Manager,
CSG Road Engineering Department
Cannondale & GT Bicycles
(ex-Cervelo, ex-Trek, ex-Velomax, ex-Kestrel)
Quote Reply
Re: The official Cervelo P5 thread [jeffp] [ In reply to ]
Quote | Reply
Thanks for your reply Jeff.

Here is a photo of what my setup looks like.. It seems as though im missing something?

[URL=http://s50.photobucket.com/...ff/media/P5.jpg.html][/url]
Quote Reply
Re: The official Cervelo P5 thread [Lemboss] [ In reply to ]
Quote | Reply
there is a long flat plate with bottle boss hole in it that goes under the armrests, armrest bolts go through it. looks lkinda like an elongated "C" in an abstract way.

see pic 2 in post 2597
Last edited by: jeffp: May 27, 13 18:43
Quote Reply
Re: The official Cervelo P5 thread [Lemboss] [ In reply to ]
Quote | Reply
 
Hi Lemboss,

This is what you need. It should come with your P5.


Quote Reply
Re: The official Cervelo P5 thread [hobie1] [ In reply to ]
Quote | Reply
Thanks for your help guys.
I was missing that part, so I called my bike shop and got it sorted.
Thanks again
Quote Reply
Re: The official Cervelo P5 thread [hobie1] [ In reply to ]
Quote | Reply
you appear to have it on upside down, it looks(could be optical illusion) that your bottle would be angled down instead of flat if installed on there
Quote Reply
Re: The official Cervelo P5 thread [campled] [ In reply to ]
Quote | Reply
So, the Teflon tape is wrapped around the aero bar extension before it is inserted into the threaded arm-rest piece? I realize that your image below is just a stock example of wrapping threads with Teflon tape, but I don't imagine that tape on the threads prior to tightening down the locking nuts / collars will help anything, so I don't think that this is what you are suggesting.

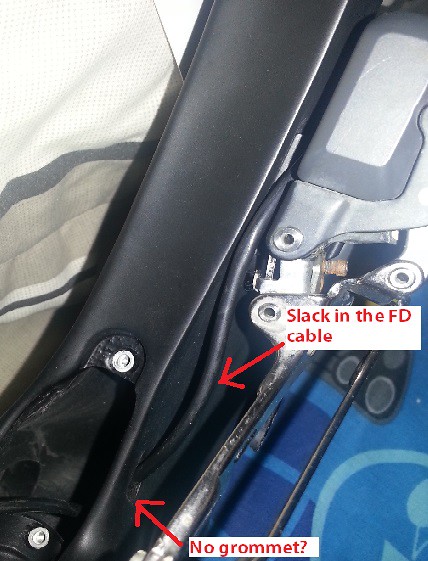
If I need to wrap around the actual extension, then I guess I need to loosen off the derailleur cables in order to pull the extensions out a bit to wrap them in tape, correct? Right now I can't pull them out very far (only about .5 cm), presumably because there is not enough slack in the cables.

Thanks.

campled wrote:
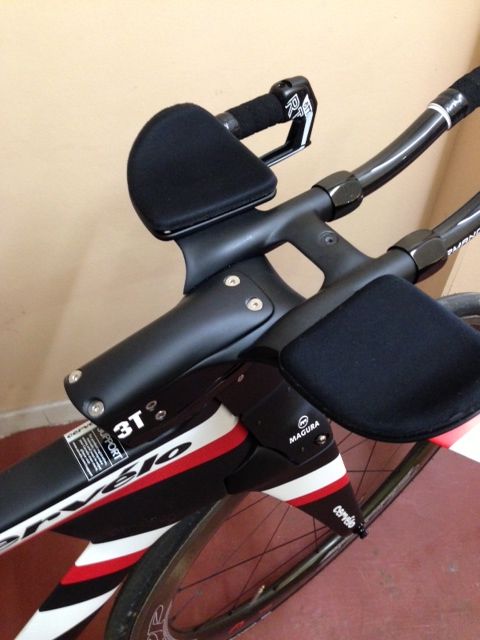
I used alot of plumbing "teflon" tape.
Now the aero extensions stay in place.
Quote Reply
Re: The official Cervelo P5 thread [damon_rinard] [ In reply to ]
Quote | Reply
 
Hi Damon,

Hope you can help me with BB installation. Please see the image below.

My crank is Rotor 3D. BB is an FSA BB-PF79. It came with a wavy washer. Do I install this? Also my Rotor crank came with an o-ring for the non drive side. Do I install this too?

Grease the BB cups before pressing it into the frame?


Thank you again for all the help!


Quote Reply
Re: The official Cervelo P5 thread [hobie1] [ In reply to ]
Quote | Reply
 
Hi Guys,

Home someone can chime in. I'm about install my bullhorn shifters on my P5-SIX. Just need to clarify which wires from the Di2 harness goes to the Cateye wires. There are 3 wires from the Cateye and 4 from Dis harness.

Please note this is the Dura Ace 10 speed 7900 series Di2 so there's no need to do the hack soldering the Cateye wires to the brifter (ST-7971) circuit board. After some research I've learned that you can splice the wires directly.

Regarding the blue wire, they say this is for Micro Adjustments of the rear derailleur. Some leave this out. I was wondering if we could use this so we can still micro adjust the rear derailleur from the Cateye buttons.


Thank you!


Quote Reply
Re: The official Cervelo P5 thread [DougWelsby] [ In reply to ]
Quote | Reply
hi doug, in my case i am using di2 so the slack of electronic wiring inside the extensions was long. for cabled wiring, you will have to disconnect the cable from the deraileurs so you can pull out the extensions just enough to wrap with teflon.
Quote Reply
Re: The official Cervelo P5 thread [Herbert] [ In reply to ]
Quote | Reply
for those who have the 2012 P5 in a 54 (not sure if that matters too much the size), but can you tell me what length the cranks are? My friend just bought a P5 here and they came with 170's. The fitter he saw wants him to get longer cranks (172.5). My friend is 179cm tall but i couldnt tell you specifics like leg length etc. My P2 came with 172.5, i was surprised his P5 came with 170's stock? Is it worth the change and expense to switch to 172.5? thanks guys
Quote Reply

Prev Next